Saturday, July 22, 2017

Down with NULL!

The introduction of null is arguably the biggest mistake in the history of computer science. Usage of null makes for sloppy code, cascading and often redundant null checks, buggy code due to missed null checks, and it makes for poor APIs.

Tony Hoare, the inventor of ALGOL W, calls it his billion-dollar mistake.

“I call it my billion-dollar mistake…At that time, I was designing the first comprehensive type system for references in an object-oriented language. My goal was to ensure that all use of references should be absolutely safe, with checking performed automatically by the compiler. But I couldn’t resist the temptation to put in a null reference, simply because it was so easy to implement. This has led to innumerable errors, vulnerabilities, and system crashes, which have probably caused a billion dollars of pain and damage in the last forty years.”.

Unfortunately, he wasn’t the only programming language inventor that couldn’t resist the temptation to put in a null reference. The inventors of Java, C# and many more fell into the same trap, causing years of pain and misery.

The designers of newer languages like Rust and Swift realized that that only way to eliminate the destructive side effects of null is by avoiding it altogether.

These languages use the optional feature instead of null.

The beauty of the optional feature is that only optional properties or methods can be null. If you try to set a non-optional property to null, you'll get compilation error.

That's an excellent language feature, because it allows to reliably exclude the possibility of null everywhere in the code, except for the parts that use optional, which should be the exception rather than the rule.

Swift is a great example. Instead of allowing every property (or method) to return nil, Swift forces you to explicitly declare that a property can be nil, otherwise, it assumes that the property is initialized.

So the below code will not compile, since the property ‘color’ is not initialized!

class Box {
   var color: String
}

You must do something like this:

class Box {
   var color: String = "Red"
}

Now, even if you never saw the implementation of Box, you know that you can safely use the property color without nil check..

// Create instance of class.
var example = Box()
if (example.color != nil) ... // NO NEED!

You can explicitly declare that a property or a method can be nil, by making it optional (adding ‘?’ post-fix after the type). However, especially for properties, that should be the exception rather than the rule.

class Box{
   var color: String = "Read"
   var colorOptional: String?
}

Now the caller knows that nil check is required. The caller doesn’t have direct access to the property, it has to unwrap it first using ‘!’

// Create Box instance.
var box = Box()

if (box.colorOptional == nil){
   print("It is nil")
}

box.colorOptional = "Blue"

if let c = box.colorOptional {
   print("Box has color \(c)")
   // The optional can be accessed with an exclamation mark.
   print(box.colorOptional!)
}

Languages like c++ and Java have added optional support via a community library, or directly to the standard library. It helps, it’s better than nothing, but it’s really too little too late.

Starting from Java SE 8 you can do this:

class Box {
    Optional<Integer> color;
}
Box box = new Box();
box.color.ifPresent(x -> System.out.println(x));

However, since Java’s type system allows null everywhere (If you try to set a non-optional property to null, the compiler wouldn’t mind), we can’t reliably exclude the possibility of null, and we still end up with null checks everywhere.

if (str != null && !str.equals("")) {
   // Do something with str
}

Unfortunately, in order to effectively combat the the terror of null, the optional feature must be backed into the language from the very beginning, and it must be enforced wholesale by the compiler.

Saturday, April 9, 2016

Scale up and scale out with .NET framework

Recently I came across a question about the ability of .NET to scale, comparing to other frameworks. Here’s my answer. I hope you’ll find it useful.

While the scalability of an application is mostly determined by the way in which the code is written, the framework / platform that is being used can significantly influence the amount of effort required to produce an application that scales gracefully to many cores (scale up) and many machines (scale out).

Before joining Microsoft, I was part of a team that built a distributed, mission critical Command and Control system using .NET technologies (almost exclusively). The applications that make up the system are deployed on powerful servers, they are all stateful, massively concurrent, with strict throughput requirements. We were able to build a quality, maintainable, production ready system in less than 3 years (which is a record time for such system).

While working for Microsoft in the past 6 years, I worked on hyper scale services deployed on thousands of machines, all of which have been written using .NET tech. In most cases, unless there’s a good reason, .NET is used for the front ends (ASP.NET MVC), mid-tier and backend services.

Here’s how .NET empowers applications that need to scale up and scale out.

Scale up:

Building a reliable, high performance application that scales gracefully to many core hardware is hard to do. One of the challenges associated with scalability is finding the most efficient way to control the concurrency of the application. Practically, we need to figure out a way to divide the work and distribute it among the threads such that we put the maximum amount of cores to work. Another challenge that many developers struggle with is synchronizing access to shared mutable state (to avoid data corruption, race conditions and the like) while minimizing contentions between the threads.

Concurrency Control

Take the below concurrency/throughput analysis for example, note how throughput peaks at concurrency level of 20 (threads) and degrades when concurrency level exceeds 25. 

​So how can a framework help you maximize throughput and improve the scalability characteristic of your application?

It can make concurrency control dead simple. It can include tools that allow you to visualize, debug and reason about your concurrent code. It can have first-class language support for writing asynchronous code​. It can include best in class synchronization and coordination primitives and collections.

In the past 13 years I’ve been following the incremental progress that the developer division made in this space - it has been a fantastic journey.

In the first .NET version the managed Thread Pool was introduced to provide a convenient way to run asynchronous work. The Thread Pool optimizes the creation and destruction of threads (according to JoeDuffy, it cost ~200,000 cycles to create a thread) through the use of heuristic ‘thread injection and retirement algorithm’ that determines the optimal number of threads by looking at the machine architecture, rate of incoming work and current CPU utilization.

In .NET 4.0, TPL (Task Parallel Library) was introduced. The Task Parallel Library includes many features that enable the application to scale better. It supports worker thread local pool (to reduce contentions on the global queue) with work stealing capabilities, and the support for concurrency levels tuning (setting the number of tasks that are allowed to run in parallel)

In .NET 4.5 -  the async-await keywords were introduced, making asynchronicity a first class language feature, using compiler magic to make code that looks synchronous run asynchronously. As a result – we get all the advantages of asynchronous programming with a fraction of the effort.

Consistency / Synchronization

Although more and more code is now tempted to run in parallel, protecting shared mutable data from concurrent access (without killing scalability) is still a huge challenge. Some applications can get away relatively easy by sharing only immutable objects, or using lock free synchronization and coordination primitives (e.g. ConcurrentDictionary) which eliminate the need for locks almost entirely. However, in order to achieve greater scalability there’s not escape from using fine-grained locks.

In an attempt to provide a solution for mutable in-memory data sharing that on one hand scales, and on the other hand easy to use and less error prone than fine grained locks – the team worked on a Software Transactional Memory support for .NET that would have ease the tension between lock granularity and concurrency. With STM, instead of using multiple locks of various kinds to synchronize access to shared objects, you simply wrap all the code that access those objects in a transaction and let the runtime execute it atomically and in isolation by doing the appropriate synchronization behind the scenes. Unfortunately, this project never materialized.

As far as I know, the .NET team was the only one that even made a serious effort to make fine grand concurrency simpler to use in a non functional language.

Speaking of functional languages, F# is a great choice for building massively concurrent applications. Since  in F# structures are immutable by default, sharing state and avoiding locks is much easier. F# also integrates seamlessly with the .NET ecosystem, which gives you access to all the third party .NET libraries and tools (including TPL).

Scale out:

Say that you are building a stateless website/service that needs to scale to support millions of users: You can deploy your ASP.NET application as WebSite or Cloud Service to Microsoft Azure public cloud (and soon Microsoft Azure Stack for on premises) and run it on thousands of machines. You get automatic load balancing inside the data-center, and you can use Traffic Manager to load balance requests cross data-centers. All with very little effort.

If you are building a statesful service (or combination of stateful and staeless), you can use the Azure Service Fabric, which will allow you deploy and manage hundreds or thousandof .NET applications on a cluster of machines. You can scale up or scale down your cluster easily, knowing that the applications scale according to available resources.

Note that you can use the above with none .NET applications. But most of the tooling and libraries are optimized for .NET.

Saturday, January 24, 2015

Could not obtain exclusive lock on database 'model'? Here’s how you find the smoking gun..

If your team owns a process that provision SQL Server databases in masses, you probably encountered the below exception in one of your test clusters, or even in production:

Microsoft.SqlServer.Management.Smo.FailedOperationException: Create failed for Database '***'.  ---> Microsoft.SqlServer.Management.Common.ExecutionFailureException: An exception occurred while executing a Transact-SQL statement or batch. ---> System.Data.SqlClient.SqlException: Could not obtain exclusive lock on database 'model'. Retry the operation later.
CREATE DATABASE failed. Some file names listed could not be created. Check related errors.

This happens because when your process attempted to create a database, some other process was using the ‘model’ database. It’s possible that someone started a session with ‘model’ via SQL Server Management Studio, or maybe a SCOM process was using it.

Anyways, the important thing is that you find the smoking gun to unlock your process and make sure that this doesn’t happen again...

If you can repro the problem, you can find the culprit simply by running: ‘EXEC sp_who2’, you will get a list of all the processes/users that use any database in your server, including the ‘model’ database.

Or, you can run the following query in order to get info on the processes that use the ‘model’ database:

DECLARE @Table TABLE
(    SPID INT,
    Status VARCHAR(MAX),
    LOGIN VARCHAR(MAX),
    HostName VARCHAR(MAX),
    BlkBy VARCHAR(MAX),
    DBName VARCHAR(MAX),
    Command VARCHAR(MAX),
    CPUTime INT,
    DiskIO INT,
    LastBatch VARCHAR(MAX),
    ProgramName VARCHAR(MAX),
    SPID_1 INT,
    REQUESTID INT) 
INSERT INTO @Table EXEC sp_who2 
SELECT * FROM  @Table WHERE DBName='model'

Alternatively, you can use:

SELECT nt_domain, nt_username, program_name, cmd, status 
FROM sys.sysprocesses 
WHERE DB_NAME(dbid)='model'

I prefer the last option. The results will look something like this:

image

However, if your process is running somewhere in the cloud, it might be helpfully to get the blame list programmatically. Here’s a sample code that detects ‘model lock’ type error and adds details on the culprit processes to the exception.

    class Program
    {
        static void Main(string[] args)
        {
            var builder = new SqlConnectionStringBuilder()
            {
                DataSource = "localhost",
                IntegratedSecurity = true
            };

            var sqlConnection = new SqlConnection(builder.ConnectionString);
            sqlConnection.Open();
            try
            {
                Server server = new Server(new ServerConnection(sqlConnection));

                string name = "test" + Guid.NewGuid().ToString("N");
                Console.WriteLine("Creating db " + name);
                Database database = new Database(server, name);
                try
                {
                    database.Create();
                    Console.WriteLine("No Failure");
                }
                catch (FailedOperationException e)
                {
                    HandleModelLockException(server.Databases, e);
                    throw;
                }
            }
            catch (Exception e)
            {
                Console.WriteLine(e.ToString());
            }
            finally 
            {
                sqlConnection.Close();
                Console.Read();
            }
        }

        private static void HandleModelLockException(DatabaseCollection databases, FailedOperationException e)
        {
            bool modelLockException = ModelDatabaseLockedAnalysis.IsModelLockException(e);

            if (!modelLockException) return;

            string message = ModelDatabaseLockedAnalysis.Analyze(databases);
            
            var s = FormatErrorMessage(message);
            throw new ModelDatabaseLockedException(s, e);
        }

        private static string FormatErrorMessage(string message)
        {
            var builder = new StringBuilder();
            builder.AppendLine();
            builder.AppendLine("Failed to create database since the system database 'model' is locked. " +
                               "Here's a list of processes that currently use the 'model database:");
            builder.AppendLine(message.Replace(" ", string.Empty));
            string s = builder.ToString();
            return s;
        }
    }

The code above creates a database, incase of an error it calls HandleModelLockException. The latter check if the exception (or one of its InnerExceptions) indicates ‘model locked’ type of error. In that case, it calls ModelDatabaseLockedAnalysis.Analyze that queries for the processes that use the ‘model’ database. Than, it simply add the list to the exception.

Here’s the implementation of ModelDatabaseLockedAnalysis:

    public class ModelDatabaseLockedAnalysis
    {
        private const string query =
            "SELECT nt_domain, nt_username, program_name, cmd, status FROM sys.sysprocesses WHERE DB_NAME(dbid)='model'";

        public static bool IsModelLockException(FailedOperationException e)
        {
            const string messageIndication = "lock on database 'model'";

            Exception exception = e;
            while (exception != null)
            {
                bool modelLockException = exception.Message.ToLower().Contains(messageIndication);
                if (modelLockException)
                {
                    return true;
                }
                exception = exception.InnerException;
            }
            return false;
        }

        public static string Analyze(DatabaseCollection databaseCollection)
        {
            var masterDb = databaseCollection["master"];
            DataSet dataSet = masterDb.ExecuteWithResults(query);
            IEnumerable<LockingProcessInfo> processInfos = Parse(dataSet);
            var builder = new StringBuilder();
            foreach (var processInfo in processInfos)
            {
                builder.AppendLine(processInfo.ToString());
            }
            return builder.ToString();
        }

        private static IEnumerable<LockingProcessInfo> Parse(DataSet dataSet)
        {
            DataTable dataTable = dataSet.Tables[0];
            var list = new List<LockingProcessInfo>();
            foreach (DataRow row in dataTable.Rows)
            {
                string domain = (string) row["nt_domain"];
                string username = (string) row["nt_username"];
                string programname = (string) row["program_name"];
                string cmd = (string) row["cmd"];
                string status = (string) row["status"];
                list.Add(new LockingProcessInfo(domain, username, programname, cmd, status));
            }
            return list;
        }
    }
    
    public class LockingProcessInfo
    {
        public LockingProcessInfo(string domain, string username, string programname, string cmd, string status)
        {
            this.Domain = domain;
            this.Username = username;
            this.Programname = programname;
            this.Cmd = cmd;
            this.Status = status;
        }

        public string Domain { get; private set; }

        public string Username { get; private set; }

        public string Programname { get; private set; }

        public string Cmd { get; private set; }

        public string Status { get; private set; }

        public override string ToString()
        {
            return string.Format("Domain: {0}, Username: {1}, Programname: {2}, Cmd: {3}, Status: {4}", Domain, Username, Programname, Cmd, Status);
        }
    }

    internal class ModelDatabaseLockedException : Exception
    {
        public ModelDatabaseLockedException(string message, Exception exception)
            : base(message, exception)
        {
        }
    }

In order to test the code, open SQL Server Management Studio, create a new query on the ‘master’ database, and run:

use model
go

That would lock the ‘model’ database until you close the query window.

Now, run the program and you will get something like:

image 

You can see clearly that the user ‘avezra’ is using the database using SQL Server Management Studio.

Sunday, May 11, 2014

Testing in Production – Benefits, Risks and Mitigations

Testing in Production (TiP) is the most important mind-shift required for building and operating a successful service at scale. This post outlines the benefits of Testing in Production, walks through the methodologies and explains the practices that can be applied to mitigate the associated risks.

Abstract

As your service grows and becomes more complex, it becomes increasingly difficult to mimic the production environment and predict how the service will be configured and used by users. For these reasons, extensive up-front testing becomes less and less effective of a tool to assess quality, and Testing in Production becomes a necessity.  

How much testing should we do in production? Well, the better we get in mitigating the associated risks, the more we can and should do. Starting from building telemetry pipelines and running Synthetic Transactions to Load Testing and Fault Injection in production.

The extra load that we put on production and the habit of presenting users with less (up-front) tested code doesn’t come without a risk. Downtimes, Disappointed customers, SLA breaches, etc. Luckily, since we are building a cloud service, we can control the deployment, change configuration to turn on/off features, and push (or rollback) new bits whenever we want. Testing in Production methodologies include practices like Synthetic Transactions, Canary Deployment, Controlled Test Flight and Data Driven Quality that have been proven very useful in mitigating these risks.

Implementing these methodologies is not easy to say the least. To make this all work, the engineering team must own the production environment (DevOps). The service needs to be separated to small, independently deployable, versioned, backward compatible and patchable services (a monolithic codebase is discouraged). Finally, the development process must be efficient to support rapid yet quality releases.

Life Without TiP

Engineering teams that don’t put their testing and engineering focus in production usually find that 1) it takes a lot of time until they detect failures in production (aka MTTD - Mean Time to Detect) and 2) that it takes a lot of time until they are able to develop a fix and deploy it with confidence (aka MTTR – Mean Time to Recover).

MTTF stands for Mean Time to Failure, which is the amount of time during which the service is up.

image

Since the formula for availability is: Up Time (MTTF) / Total Time (MTTF + MTTD + MTTR). It’s apparent that in order to maximize availability we need to either increase MTTF (i.e. aim for zero failures) or reduce MTTD and MTTR (combined, they are also referred to as MTTH - Mean Time to Heal).

A popular way to increase MTTF is by running tests in test labs (scale down version of the production environment). The problem with lab tests is that they require significant engineering investment. These tests tend to fail, most of the time on false positives (test bugs). It’s also difficult to predict how users will use the system thus automated test cases can only get us so far. Lastly, most production environment are very complex, it’s hard (if not impossible) to simulate the configuration, network, load balancers and other (3rd party) hardware and software that make up the production environment.

Since we can’t predict how users will use our service and we can’t mimic the production environment – we practically have no choice, we must Test in Production. However, we also must acknowledge the associated risks and come out with the right mitigations.

The Twist (Engineering Investment)

image

The first thing to change when shifting to TiP is increase the investment in dev testing, which includes unit testing and continues integration. These unit tests run in isolation and don’t require a lab. Since they run fast and execute more frequently – they help to improve the so called ‘dev inner loop’, which means that we can get faster feedback on the quality of a given change.

By applying TiP methodologies like Canary Deployment (covered in the next chapter) and with our improved dev inner loop: we can push small and targeted changes directly to the Pre-Production (Dogfood/Beta) environment, potentially bypassing the traditional up-front testing in the lab. The Pre-Production environment is deployed in our production data center. It is used by the engineering team and by internal users. The main tool to asses quality in this environment is Data Mining. In addition to the traffic generated by the real users, we can run Synthetic Tests (potentially re-use the end to end lab tests) to trigger new scenarios.

We can use the time that we saved to invest in getting more meaningful insights from the data that we collect. Insights that will allow us to asses quality and detect bugs that impact customers (the ones that actually need fixing). We can also invest more in synthetic tests, alerting, reducing noise, auto healing etc.

Methodologies

image 

TiP Methodologies are divided to Passive and Active. The Passive methodologies include data mining, which is used to asses quality and measure performance. The active ones are obviously riskier, they include Synthetic Tests and Load Testing.

We separate the methodologies to Crawl, Walk and Run. Crawl methodologies are lower risk. Walk and Run methodologies are riskier and require the tools that we built while crawling. We can use this system to start small, pick up the low hanging fruits and as we get better, we can mitigate the risks associated with Walk and Run methodologies.

Data Driven Quality (Passive, Crawl)

The traditional way to asses quality is via manual testing or automated tests. Data driven quality is about crawling though the data that the service generates (logs, counters etc) in order to asses quality. To enable this, we need to instrument the code such that our service will produce meaningful data. Alan Page does a great job in explaining this mind shift.

Here’s the example from Alan’s blog: Say that we are building an AppStore service. The service enables users to locate an application in the store, download and install the app. The traditional approach will be to use test automation to verify the happy path (can I find an app, download and install?), and test the failure cases by injecting failures into system. We will typically use this test automation to asses the quality of service in order to decide if we can go to production.

The Data Driven approach suggest to 1) instrument the code such that the service log all the important events including failure events, and 2) mine the log data that the service generates to asses quality.

Using the appropriate tools, we can analyze the data that’s coming from our preproduction and production environments to generate charts that look like this:

image

If we can ship new bits to our preproduction environment frequently enough (say every day), we can use the analysis results to decide if the bits are quality enough to go to production. 

Canary Deployment

Canary deployment is about deploying new code to a small sub-set of the machines in production, verifying that the the new bits didn’t cause regression (functionality and performance), and slowly increasing the exposure of the bits to the rest of the machines in production.

By limiting the exposure to the new bits, we can minimize the impact of failures and can afford to release new bits with less up-front testing.

image

Controlled Test Flight

With Controlled Test Flight, we separate the the users to two or more groups, and assign a ‘flight’ to each group via configuration. When a user issue a request, the service may route the user to a different experience depending on the flight to which to user is assigned.

Controlled Test Flight can help to validate that a new code works well in production, without exposing all the users to the new code.

Controlled Test Flight is often used in combination with Canary Deployment. We use Canary Deployment to deploy new bits to sub-set of the machines, and we use Controlled Test Flight to route only test users to the new bits. We trigger the important scenario using the test users and verify that the new bits work as expected. If the new bits work as expected (the Canary didn’t die…), we release the bits to the rest of the machines and complete the experiment.

image

A/B Testing (Experimentation for Design)

A/B Testing is very similar to Controlled Test Flight in the sense that in both we divide the users to groups and present each group with a different experience. The difference is in the intent. With Controlled Test Flight we try to verify that our new bits work as expected. Essentially we check if we built it right. With A/B Testing we experiment with multiple experiences in order to make sure that we build the right thing.

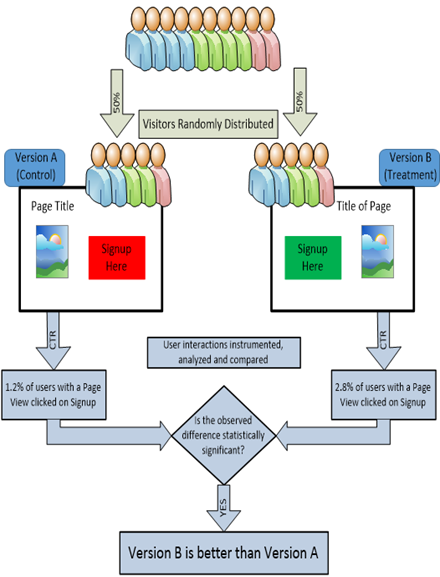
With A/B Testing we divide the users to two groups. We present each group with a different experience, analyze user interaction patterns for each experiment, and based on the results, we pick the best experience. Using this system we detect ineffective features and can cut our losses early, and we can detect successful features and increase the investment accordingly.

In the example bellow we try to calculate which user experience will yield more signups. We present 50% of the users with UI in which the Signup button is in the right hand side. The remaining 50% will see UI in which the Signup button is in the left hand side. We run the experiment for a week. We calculate the click rate for each UI and based on the results we choose the UI that yielded more clicks.
image

Synthetic Transaction Monitoring

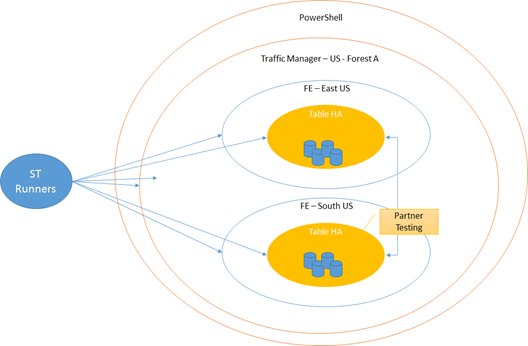
Synthetic tests are automated tests running against the production instances. Synthetic tests can be divided to two groups. API Tests and User Scenario Tests.

API Tests usually run against every component that expose public API. If the example bellow, the service can be used via PowerShell, that calls region wide API managed by Azure Traffic Manager. Traffic Manager will route the request to one of the FE services. The latter will use an Highly Available Table Store service.

Since each one of the layers expose public API, we will run Synthetic Tests against each API. This way, in case of a failure that surface in the upper layer, we will be able to peel the onion and find the faulty layer.
image

User Scenario Tests are about testing the service though the same interfaces used by the users. If the users interact with the service via Browser, we will run the tests via Browser, etc.

image

Even for mature services where the important scenarios are already triggered by real users, Synthetic Tests are useful for triggering new scenario that are not yet discoverable by real users. In addition, they keep the service busy when there’s low engagement form real users. 

Friday, May 9, 2014

Azure Table Storage: Writing data in a batch

Azure table support writing items in a batch, as long as 1) all the items are in the same partition and 2) the batch is not bigger than 100 items (if it is, you get ‘unexpected response code for operation : 0’). 

If you have a big list of items of different partitions you will have to write the logic to split the items by partition and send 100 items at a time. This post provides a suggested implementation for the same

The code+tests can be downloaded from here.

Here’s the main workflow, it does the following.

  1. We create a new Azure Table (in the Table Emulator)
  2. Create 2 groups of 150 items, each group in a different partition. 
  3. Use the BatchCalculator class to split the items into batches.
  4. Write each batch to the table
        static void Main(string[] args)
        {
            // Make sure that Azure Storage Emulator is running
            
            Console.WriteLine("Creating new table");
            CloudTable table = CreateTable();
            try
            {
                const int numberOfItemsInPartition = 150;
                IEnumerable<ITableEntity> items1 = GetNewPartitionData(numberOfItemsInPartition);
                IEnumerable<ITableEntity> items2 = GetNewPartitionData(numberOfItemsInPartition);

                var all = new List<ITableEntity>(items1);
                all.AddRange(items2);

                Console.WriteLine("Writing {0} items", all.Count);
                BatchDiagnostics batchDiagnostics = WriteBatch(table, all).Result;

                Console.WriteLine("Diagnostic:" + batchDiagnostics);
            }
            catch(Exception exception)
            {
                Console.WriteLine(exception);
            }
            finally
            {
                Console.ReadLine();
                Console.WriteLine("Deleting table");
                table.Delete();
            }
        }

        private static CloudTable CreateTable()
        {
            CloudStorageAccount storageAccount = CloudStorageAccount.DevelopmentStorageAccount;

            // Create the table client.
            CloudTableClient tableClient = storageAccount.CreateCloudTableClient();

            // Create the table if it doesn't exist.
            var table = tableClient.GetTableReference("batchtesttable");
            table.CreateIfNotExists();

            return table;
        }

        private static IEnumerable<ITableEntity> GetNewPartitionData(int numberOfItems)
        {
            var list = new List<ITableEntity>();

            Guid partition = Guid.NewGuid();
            for (int i = 0; i < numberOfItems; i++)
            {
                list.Add(new MyEntity()
                {
                    SomeData = "Data",
                    RowKey = i.ToString(CultureInfo.InvariantCulture),
                    PartitionKey = partition.ToString()
                });
            }
            return list;
        }

        private static async Task<BatchDiagnostics> WriteBatch<T>(CloudTable table, IEnumerable<T> entities) where T : ITableEntity
        {
            BatchDiagnostics diagnostics;
            IEnumerable<TableBatchOperation> batches = BatchCalculator.GetBatches(entities, out diagnostics);

            var tasks = batches.Select(table.ExecuteBatchAsync);
            await Task.WhenAll(tasks);

            return diagnostics;
        }
    }

    public class MyEntity : TableEntity
    {
        public string SomeData;
    }

Here’s the implementation of BatchCalculator. This class is responsible to split the items to groups, where each group is not bigger than 100 and all items belong to the same partition.

    public class BatchCalculator
    {
        const int batchMaxSize = 100;

        public static IEnumerable<TableBatchOperation> GetBatches<T>(IEnumerable<T> entities, out BatchDiagnostics diagnostics) where T : ITableEntity
        {
            var list = new List<TableBatchOperation>();

            IGrouping<string, T>[] partitionGroups = entities.GroupBy(arg => arg.PartitionKey).ToArray();
            foreach (IGrouping<string, T> entitiesGroupedByPartition in partitionGroups)
            {
                T[] groupList = entitiesGroupedByPartition.ToArray();
                int pointer = batchMaxSize;
                T[] items = groupList.Take(pointer).ToArray();
                while (items.Any())
                {
                    var tableBatchOperation = new TableBatchOperation();
                    foreach (var item in items)
                    {
                        tableBatchOperation.Add(TableOperation.InsertOrReplace(item));
                    }
                    list.Add(tableBatchOperation);
                    items = groupList.Skip(pointer).Take(batchMaxSize).ToArray();
                    pointer += batchMaxSize;
                }
            }

            diagnostics = new BatchDiagnostics(partitionGroups.Length, list.Count);
            return list;
        }
    }

    public class BatchDiagnostics
    {
        private readonly int partitions;
        private readonly int batches;

        public BatchDiagnostics(int partitions, int batches)
        {
            this.partitions = partitions;
            this.batches = batches;
        }

        public int Partitions
        {
            get { return partitions; }
        }

        public int Batches
        {
            get { return batches; }
        }

        public override string ToString()
        {
            return string.Format("Partitions: {0}, Batches: {1}", partitions, batches);
        }
    }

HTA! Aviad

Sunday, January 5, 2014

HDInsight Service (Hadoop on Windows Azure) – Hive Partitions

The post will walk you through the process of creating, loading and querying partitioned Hive Table via HDInsight

Follow the steps here to create HDInsight Cluster and to install  Windows Azure PowerShell.

Upload data to HDInsight Cluster

Download the file w3c_2MB.txt to your local drive, say to ‘C:\w3c_2MB.txt’

Since HDInsight uses the Azure Blob Storage as its distributed file storage (unlike non-could Hadoop clusters that use the default HDFS implementation that’s based on local file-system), you can choose your preferred tool to upload data. We will use Windows Azure PowerShell to upload the sample data.

Open MIcrosoft Azure PowerShell

Run the command below, you will be prompt to login to your Azure account:

Add-AzureAccount

Paste the following script into the Windows Azure PowerShell console window to run it.

$subscriptionName ="<your-subscription>"
$storageAccountName = "<your-storage-name>"
$containerName = "<your-cluster-name>"

$fileName ="C:\w3c_2MB.txt"
$blobName = "user/hdp/myexample/w3c_2MB.txt"

# Get the storage account key
Select-AzureSubscription $subscriptionName
$storageaccountkey = get-azurestoragekey $storageAccountName | %{$_.Primary}

# Create the storage context object
$destContext = New-AzureStorageContext -StorageAccountName $storageAccountName -StorageAccountKey $storageaccountkey

# Copy the file from local workstation to the Blob container        
Set-AzureStorageBlobContent -File $fileName -Container $containerName -Blob $blobName -context $destContext
image 

Initialize Hive session in Windows Azure PowerShell

Since we are already using Windows Azure PowerShell, we will continue to use it to submit Hive jobs. Quite frankly, PowerShell is not the best tool for ad-hoc interaction with Hive. To debug Hive jobs, (as of now) it’s better to remote connect to the cluster and use the built in Hive CLI. Even for automation, it’s simpler to submit jobs via the .NET SDK. The Hive support in Windows Azure PowerShell might become handy if you already have automated PS script and you want to keep everything in that script.

Before you start running Hive queries via Windows Azure PowerShell (using the Invoke-Hive cmdlet), you need to select your cluster. Paste the following script into the Windows Azure PowerShell console window to run it.

$subscriptionName ="<your-subscription>" 
$clusterName = "<your-cluster-name>"

# Select the cluster
Select-AzureSubscription $subscriptionName
Use-AzureHDInsightCluster $clusterName 

Create Non-Partitioned Hive Table

The script bellow will create a new Hive table name ‘w3c’ and load it with the date that we uploaded to the blob in the previous section

You should know that operations like create/delete execute faster when using New-AzureHDInsightHiveJobDefinition and Start-AzureHDInsightJob instead of Invoke-Hive (more details here). I choose to use Invoke-Hive for all the hive queries in this post to keep things simple.

# HiveQL query
$queryString = "DROP TABLE w3c;" + 
               "CREATE TABLE w3c(
        logdate string,  logtime string,  c_ip string,  
        cs_username string,  s_ip string, 
        s_port string,  cs_method string, cs_uri_stem string,  
        cs_uri_query string,  sc_status int,  
        sc_bytes int,  cs_bytes int,  time_taken int,  
        cs_agent string,  cs_Referrer string)
        row format delimited
        fields terminated by ' ';"  + 
        "LOAD DATA INPATH 'myexample/w3c_2MB.txt' OVERWRITE INTO TABLE w3c";


# Submit the job to the cluster 
Invoke-Hive -Query $queryString

image

Since we created internal table. the file will be deleted from its original location and moved to hive warehouse.

Query the Non-Partitioned Hive Table

The script bellow will count the number of rows where the column cs_uri_stem equals ‘/Default.aspx’

$queryString = "SELECT COUNT(*) FROM w3c WHERE cs_uri_stem='/Default.aspx';"

# Submit the job to the cluster 
Measure-Command { Invoke-Hive -Query $queryString }
image 

Create Partitioned Hive Table

The script bellow will create a new, partitioned Hive table name ‘w3c_partitioned’. Notice that comparing to the table ‘w3c’, cs_uri_stem is not a column, It’s a partition

$queryString = "DROP TABLE w3c_partitioned;" + 
        "CREATE TABLE w3c_partitioned(
        logdate string, logtime string, c_ip string, 
        cs_username string,  s_ip string,  
        s_port string,  cs_method string,  cs_uri_query string,
        sc_status int,  sc_bytes int, cs_bytes int, time_taken int, 
        cs_agent string,  cs_Referrer string)
        PARTITIONED BY (cs_uri_stem string)
        row format delimited
        fields terminated by ' ';"

# Submit the job to the cluster 
Invoke-Hive -Query $queryString 

Insert data into the Partitioned Table

The following script will populate the partitions with data selected from the table w3c.

Notice that:

  • We’re inserting the rows where the cs_uri_stem cell equals ‘/Default.aspx‘ into partition ‘cs_uri_stem='/Default.aspx‘.
  • We’re inserting the rows where the cs_uri_stem cell equals ‘/Info.aspx‘ into partition ‘cs_uri_stem='/Info.aspx‘.
  • We’re inserting the rows where the cs_uri_stem cell equals ‘/UserService‘ into partition ‘cs_uri_stem='/UserService‘
$queryString = "FROM w3c 
        INSERT OVERWRITE TABLE w3c_partitioned PARTITION (cs_uri_stem='/Default.aspx')
        SELECT w3c.logdate, w3c.logtime, w3c.c_ip, 
        w3c.cs_username, w3c.s_ip, 
        w3c.s_port, w3c.cs_method, w3c.cs_uri_query, 
        w3c.sc_status, w3c.sc_bytes, w3c.cs_bytes, w3c.time_taken, 
        w3c.cs_agent, w3c.cs_Referrer 
        WHERE cs_uri_stem='/Default.aspx';"


# Submit the job to the cluster 
Invoke-Hive -Query $queryString 

$queryString = "FROM w3c 
        INSERT OVERWRITE TABLE w3c_partitioned PARTITION (cs_uri_stem='/Info.aspx')
        SELECT w3c.logdate, w3c.logtime, w3c.c_ip, 
        w3c.cs_username, w3c.s_ip, 
        w3c.s_port, w3c.cs_method, w3c.cs_uri_query, 
        w3c.sc_status, w3c.sc_bytes, w3c.cs_bytes, w3c.time_taken, 
        w3c.cs_agent, w3c.cs_Referrer 
        WHERE cs_uri_stem='/Info.aspx';"


# Submit the job to the cluster 
Invoke-Hive -Query $queryString 

$queryString = "FROM w3c 
        INSERT OVERWRITE TABLE w3c_partitioned PARTITION (cs_uri_stem='/UserService')
        SELECT w3c.logdate, w3c.logtime, w3c.c_ip, 
        w3c.cs_username, w3c.s_ip, 
        w3c.s_port, w3c.cs_method, w3c.cs_uri_query, 
        w3c.sc_status, w3c.sc_bytes, w3c.cs_bytes, w3c.time_taken, 
        w3c.cs_agent, w3c.cs_Referrer 
        WHERE cs_uri_stem='/UserService';"


# Submit the job to the cluster 
Invoke-Hive -Query $queryString 


image

Looking into the partitioned table in hive warehouse, you should notice that a dedicated folder has been added for each partition

image

Query the Partitioned Hive Table

The script bellow will query the table w3c_partitioned for the number of rows where the column cs_uri_stem='/Default.aspx' .

$queryString = "SELECT COUNT(*) FROM w3c_partitioned WHERE cs_uri_stem='/Default.aspx';"

# Submit the job to the cluster 
Invoke-Hive -Query $queryString 

image

Since the table is partitioned by the column cs_uri_stem, instead of scanning the entire data-set, Hive is scanning only the partition '/Default.aspx‘.

Delete the tables  

$queryString = "Drop table w3c;Drop table w3c_partitioned;" 

# Submit the job to the cluster 
Invoke-Hive -Query $queryString

Friday, January 3, 2014

HDinsight Emulator – Using Sqoop to import/export data from/to SQL Server Express

This post will walk you through the process of importing/exporting data from/to SQL Server Express via Sqoop .

Create dev box in the cloud (optional)

If you don't want to install the HDInsight Emulator on your development machine, you can create a VM in the cloud via Azure IaaS Virtual Machine Service (given that you have Azure Subscription).

Open the Azure Management Portal, click on the Virtual Machine tab, click ‘New’ and select your preferred version on Visual Studio.

image

If you don’t need Visual Studio, you can install VM with Windows Server.

image

Once your VM is ready, it will appear as ‘Running’ in the Virtual Machine Tab. You can Remote Connect to the VM using the link in the portal.

image

For more details on Azure VM, in this post, Scott Hanselman shows how he’s using the Visual Studio image to get work done from his Surface 2 Tablet.

Install HDinsight Emulator

HDInsight Emulator is a single node HDInsight deployment that allows developers to develop on and debug jobs on their local development box. You can install the HDInsight Emulator via Web Platform Installer from here. All the missing prerequisites will be detected and installed automatically!

image

Once the installation is complete, you will notice that all the supported Hadoop services will be running as Windows Services on your local machine.

HDI.Emulator.Services.

Install and configure SQL Server Express

If you have full SQL Server instance installed on your machine, you can skip to the next step. If you want to use the free SQL Express instance, some extra configurations are needed. Here’s how you install and configure SQL Express to make it work with Sqoop.

  • Open ‘Web Platform Installer’ (install from here)
  • Type ‘sql express ‘ in the search box
  • Click ‘Add’ next to ‘SQL Server Express 2008’ and ‘SQL Server Express 2008 Management Studio’

image

  • Set the password for the admin account (you will need to use it in the next step)

image

  • Open ‘SQL Server Configuration Manager’
image
  • Enable the TCP/IP protocol for SQLExpress.
    • Expend ‘SQL Server Network Configuration’
    • Right click on ‘Protocols for SQLExpress’
    • Right click on ‘TCP/IP’ and select ‘Enable’

image

  • Restart SQL Server service.
    • Click on ‘SQL Server Services’
    • Right click on ‘SQL Server (SQLExpress)’ and select ‘Restart’

image 

  • Start ‘SQL Server Browser’ service
    • Click on ‘SQL Server Services’
    • Right click on ‘SQL Server browser’ and select ‘Properties’
    • Change the ‘Start Mode’ to ‘Automatic’, click apply and close the properties window.
    • Start the service

image

Create Database and Table

  • Open ‘SQL Server Management Studio’ and Connect to ‘SQL Express’ server (default)

image

  • Create ‘New Query’

image

  • Run the following command to create new Database (sqoop) and Table (w3c) schema
CREATE DATABASE sqoop 

Go

Use sqoop

Go

CREATE TABLE [dbo].[w3c]( 

[logdate] nvarchar(150) NULL, [logtime] nvarchar(150) NULL, 

[c_ip] nvarchar(150) NULL, [cs_username] nvarchar(150) NULL, 

[s_ip] nvarchar(150) NULL, [s_port] nvarchar(150) NULL, 

[cs_method] nvarchar(150) NULL, [cs_uri_stem] nvarchar(150) NULL, 

[cs_uri_query] nvarchar(150) NULL, [sc_status] [bigint] NULL, 

[sc_bytes] [bigint] NULL, [cs_bytes] [bigint] NULL, 

[time_taken] [bigint] NULL, [cs_agent] nvarchar(150) NULL, 

[cs_referrer] nvarchar(150) NULL) ON [PRIMARY] 

Upload data to HDFS

  • Download the file w3c_2MB.txt 
  • Upload the file from your local drive to HDFS under the folder ‘sqoop’
    • Open the ‘Hadoop Command Prompt’ window (shortcut should be available on your desktop), type:

   > hadoop fs -copyFromLocal w3c_2MB.txt ./sqoop/w3c_2MB.txt

    • Make sure that the file has been uploaded, type:

   > hadoop fs –lsr

image

Export from HDFS to SQL Express

  • Open the ‘Hadoop Command Prompt’ window (shortcut should be available on your desktop), type:
  • In the script bellow replace:
    • <your-sql-password> with the password that you’ve chosen when you installed SQL Express
    • <your-user-name> with the name of your machine

If you are using full SQL Server: instead of localhost\sqlexpress, use localhost. Make sure that the specified user (sa) is enabled and has write permissions on your SQL Server. Notice that you must use SQL Server Authentication.

   > cd c:\Hadoop\sqoop-1.4.2\bin

   > sqoop export --connect "jdbc:sqlserver://localhost\sqlexpress;databaseName=sqoop;user=sa;password=<your-sql-password>" --table w3c --export-dir /user/<your-user-name>/sqoop -m 1 -input-fields-terminated-by " "

Note:

  • Make sure that the export completed successfully

image

  • Open ‘SQL Server Management Studio’ and Connect to ‘SQL Express’ server (default).
  • Create ‘New Query’ Run:
Use sqoop

Go

Select * from w3c
image 

Import from SQL Express back to HDFS

  • Open the ‘Hadoop Command Prompt’ window (shortcut should be available on your desktop)
  • In the script bellow replace:
    • <your-sql-password> with the password that you’ve chosen when you installed SQL Express
    • <your-user-name> with the name of your machine

   > cd c:\Hadoop\sqoop-1.4.2\bin

   > sqoop import --connect "jdbc:sqlserver://localhost\sqlexpress;databaseName=sqoop;user=sa;password=<your-sql-password>" --table w3c --target-dir /user/<your-user-name>/sqoop/import --fields-terminated-by " " -m 1

  • Make sure that the export completed successfully

    > hadoop fs –ls  /user/<your-user-name>/sqoop/import

image

Import data from SQL Server Express directly to Hive table

  • Open the ‘Hadoop Command Prompt’ window (shortcut should be available on your desktop)
  • In the script bellow replace:
    • <your-sql-password> with the password that you’ve chosen when you installed SQL Express

   > cd c:\Hadoop\sqoop-1.4.2\bin

   > sqoop import --connect "jdbc:sqlserver://localhost\sqlexpress;databaseName=sqoop;user=sa;password=<your-sql-password>" --table w3c --hive-table w3c_sqoop --create-hive-table --hive-import -m 1

image

  • Make sure that the export completed successfully.
  • Open hive CLI:

   > c:\Hadoop\hive-0.9.0\bin\hive

   hive> SELECT COUNT(*) FROM w3c_sqoop

image

Saturday, December 28, 2013

HDInsight - Hadoop on Windows Azure!!

In the past year, I’ve been working with the HDInsight team on making the Hadoop eco-system available on Windows Server and Windows Azure. We built services that enable Azure users to quickly deploy elastic Hadoop clusters (based on Hortonworks’s Hadoop Distribution Package for Windows) on Windows Azure. By harnessing the parallel processing  power of Hadoop, HDInsight clusters enable users to effectively analyze Tera bytes and Peta bytes of data stored in Azure Blob Storage.

We released installation package that enables developers to quickly and easily install a single node HDInsight cluster (HDInsight Emulator) on their dev box.

We developed open source SDK that includes PowerShell cmdlets (now integrated with Windows Azure PowerShell) and .NET APIs that make it easier to deploy, manage and run jobs against HDInsight cluster.

To help you get started, this post demonstrates how to:

  1. Deploy and interact with HDInsight cluster on Windows Azure.
  2. Install HDInsight Emulator on a local dev box.

HDInsight Service

HDInsight Service enables users to deploy Hadoop clusters on Azure. These cluster are used to analyze data stored in Azure Blob Storage. To make this work, Azure HDInsight clusters are configured to use the ASV (Azure Storage Vault) implementation of HDFS, which reads/writes/streams data via Azure Blob instead of the local file-system.

The practice of using Azure Blob instead of local storage often raises questions regarding network latency and the loss of Data Locality. Luckily, HDInsight clusters and storage accounts are deployed on Azure Q10 infrastructure that features incredibly low networking overhead. As a result, for up to 50 worker nodes, reading from Azure Blob is just as fast  as reading from the local disk.

Storing the data in Azure storage instead of on the workers local storage has many benefits. In addition to geo replication and faster writes, the most obvious gain is that the data is not attached to the cluster. This enables you to create/delete clusters without a need to migrate the data. Brad Sarsfield and Denny Lee did a great job explaining ‘Why use Blob Storage with HDInsight on Azure?’

Creating an HDInsight cluster

Once you have Windows Azure subscription, deploying HDInsight cluster is only couple of clicks away. You can use the management portal to create a storage account (will store the data to be processed by your HDInsight cluster) and HDInsight cluster that will be associated with that account.

Once your cluster is ready, it will appear under the HDInsight tab.

image

Since your new HDinsight cluster is using its associated storage account as Distributed File System - you will notice that all the files that you might be used to see in HDFS (if you used Hadoop on non cloud environment) are stored in the Blob Storage under a container with the name of your cluster.

image

Interacting with HDInsight cluster

You can use the Windows Azure PowerShell module to deploy/delete HDInsight clusters and run jobs on your cluster. Click here to install via Web Platform Installer. image

Once the installation is complete, launch the Windows Azure PowerShell window.

You can quickly authenticate using your Windows Azure Account (you can also use cert). Type: Add-AzureAccount image

The Sign in window will appear,  enter your credentials and click Continue.image

Select your subscription:

PS C:\> $subscriptionName ="Visual Studio Ultimate with MSDN"

PS C:\> Select-AzureSubscription $subscriptionName

Query for available cluster:

Once the appropriate subscription is selected, you can query for a list of your HDInsight clusters by:

PS C:\> Get-AzureHDInsightCluster

image

Run 10GB GraySort (Tera Gen/Sort/Validate) Job

Since hadoop-examples.jar comes with the HDInsight cluster, you can run any one of the jobs available in that examples package.

Follow the instructions here to run the GraySort mini benchmark that will generate 10GB of data, sort the data and validate the results. Works like a champ!

image

image

image

HDInsight Emulator

HDInsight Emulator is a single node HDInsight deployment that allows developers to develop and debug jobs on their local development box. You can install the HDInsight Emulator via Web Platform Installer from here. All the missing prerequisites will be detected and installed automatically!

image

Once the installation is complete, you will notice that all the supported Hadoop services will be running as Windows Services on your local machine.

You are good to go! Follow the instructions here to learn how to run MR/HIve/Pig jobs on your local HDInsight cluster. You will notice that HDFS is configured as the default distributed file system. You can however, change the core-site.xml to point to your Azure Blob Storage account.