Introduction
This article reviews the way in which .NET Framework enables developers to data bind business objects to the UI at design time, much needed feature that is new to visual studio 2005.
It will walk you through a step by step tour, starting from the design time binding of typed DataSet's, through binding of simple data objects, to binding of complex business objects that were designed with no restrictions and no respect to UI needs.
Attached to this article is C# .2.0 sample project that shows how collection of business objects can become viewable and sortable such that data-bound controls can bind to them already in design time.

Data Binding in .NET
Data binding enables visual element to link to a data source and stay in synch with it such that any changes made to the data source are reflected immediately on the visual element and vice versa.
In the .NET world, data source can be represented by typed DataSets that visual studio generates usually according to database scheme, and it can be represented by simple 'man made' objects; the latter can be humble data containers or intelligent business objects that also contain data.
Data source can be bound to UI control at design time using visual-studio designer, and it can be bound programmatically at run time through code that looks like -
textBox1.DataBindings.Add("Text", customerDataEntity, "CustomerId");
textBox2.DataBindings.Add("Text", customerDataEntity, "CompanyName");
|
Naturally, we will rather bind data at design time in order to avoid this kind of tedious code.
In the earlier versions of visual studio only typed DataSet could have been bound to UI control at design time, and that's only if both the DataSet and the control reside in the same project.
Fortunately, the introduction of the BindingSource component in visual studio 2005 allows us to bind UI control to a custom business class already at design time. This way, instead of binding and formatting each public property of the class through code (like shown above) - we can do it at design time using the control built-in designers. We will see how it’s can done momentarily.
Binding to 'typed DataSet's'
Since typed DataSet's are fully integrated with visual studio designer, once made, they can be immediately bound to UI controls that reside in the same project at design time. Smart controls such as DataGridView can be fully customized at design time once they are bound to typed DataSet.
Lets take a look, given a DataSet with the following schema -
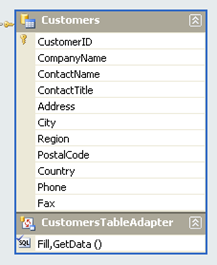
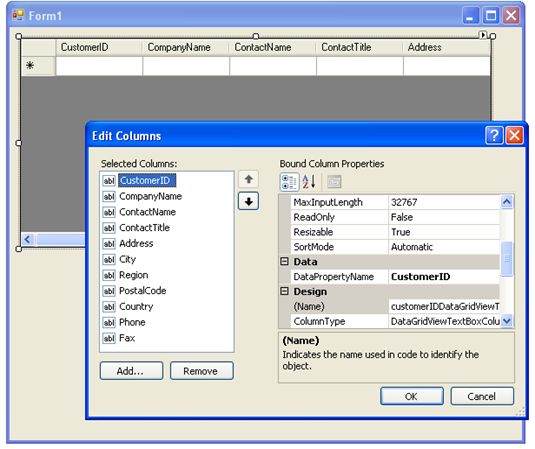
As a result of binding the above dataset to a DataGridView, all the columns of the 'Customers' table are automatically added to the DataGridView. The DataGridView columns can then be edited at design time, using the DataGridView columns editor designer that is shown bellow.
Binding of simple raw data objects
Unlike typed DataSet's - raw data classes such as PersonDetails (shown below) are not inherently integrated with visual studio so we can't immediately bind then at design time to any UI control that resides in the same project. We have to work a little harder.
To start with, let's take a look at PersonDetails class -
public class PersonDetails
{
    private readonly string m_name;
    private readonly string m_address;
    private readonly string m_phone;

    public PersonDetails(string p_name, string p_address, string p_phone)
    {
        m_name = p_name;
        m_address = p_address;
        m_phone = p_phone;
    }

    public string Name
    {
        get { return m_name; }
    }

    public string Address
    {
        get { return m_address; }
    }

    public string Phone
    {
        get { return m_phone; }
    }
}
|
In order to bind PersonDetails to UI control at design time, we need to set up the PersonDetails class within the UI project. This is done using the 'Data Source Configuration Wizard' (from visual studio main menu - select the Data|Show Data Sources menu item).
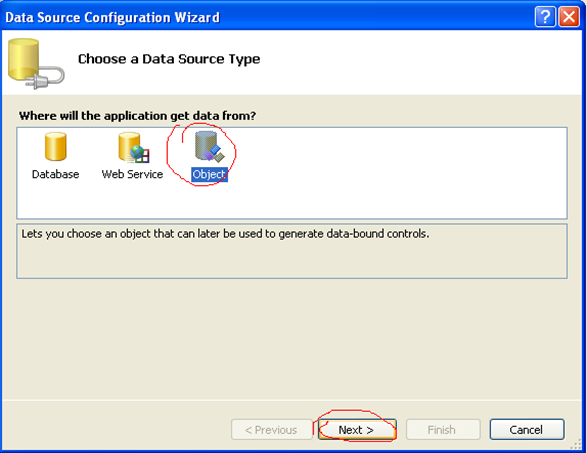
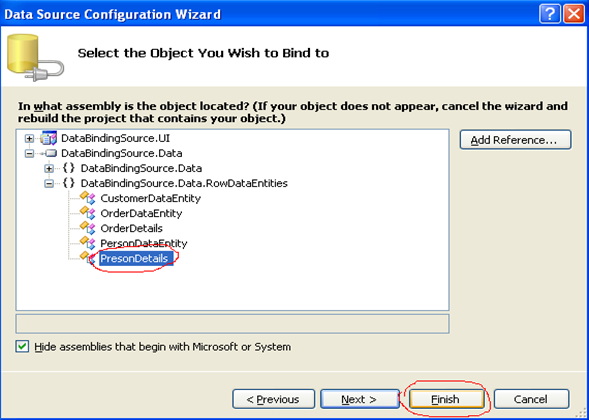
Select 'Object' as the data source and click 'Next'. All the public classes that are referenced by the UI project will be listed; select the PersonDetails class, and click 'Finish'.
After completing the wizard, drag drop DataGridView control on the form surface, select the 'DataSource' property of the grid, you will see that the PersonDetails class appears under 'Other Data Sources' node, click on 'PersonDetails'.

As a result, 1) new BindingSource component called presonDetailsBindingSource that’s bound to 'PersonDetails' type is automatically added to the form, 2) presonDetailsBindingSource is assigned as the data source of DataGridView, 3) three columns are added to the DataGrdiView, one column for each property of 'PersonDetails' class.
The columns that were generated can then be edited at design time, using the DataGridView columns editor designer shown bellow.
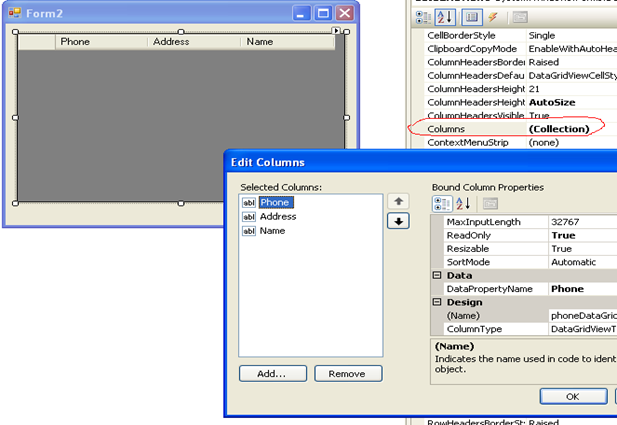
In order to present collection of 'PersonDetails' objects on the grid, all we need to do is to assign the collection to presonDetailsBindingSource.
ICollection<PersonDetails> m_personDetailses private void UpdateBindingSource()
{ m_personDetailses = m_personsDataMapper.GetPersons();
m_presonDetailsBindingSource.DataSource = m_personDetailses; }
|
Updating the Display
The next step after attaching the data source to its binding source is to attach the binding source to the appropriate view/s.
grid.DataSource = m_presonDetailsBindingSource;
|
In order to get the grid updated with latest state of its underlying data source, we call ResetBinding on the binding source.
m_presonDetailsBindingSource.ResetBinding();
|
In order to get the data source updated with changes made through the grid, we call EndEdit on the binding source.
m_presonDetailsBindingSource.EndEdit(); m_personsDataMapper.Update(m_personDetailses);
|
Binding complex business objects
Important rule of domain model design is to ignore presentation needs when designing the business object model. Thus, business objects should be designed according to the data structure and business rules alone.
This approach makes presentation modification easy, as well as the adding of another presentation at latter stage. You can read about separating the domain (model) from the application (presenter) and presentation (view) here.
So, because business objects are domain oriented by nature - in most cases we can't bind them 'as is' to the UI. Let's take a look at business entity called CustomerDataEntity -
public class CustomerDataEntity
{
    private readonly string m_id;
    private readonly PersonDetails m_details;
    private readonly bool m_IsPreferred;
    private readonly PersonDataEntity m_Contact;
    private List<OrderDataEntity> m_orders = new List<OrderDataEntity>();

    public CustomerDataEntity(string p_id, PersonDetails p_details,
        bool isPreferred, PersonDataEntity contact)
    {
        m_id = p_id;
        m_details = p_details;
        m_IsPreferred = isPreferred;
        m_Contact = contact;

    }

    public string ID
    {
        get { return m_id; }
    }

    public PersonDetails Details
    {
        get
        {
            return m_details;
        }
    }

    public bool IsPreferred
    {
        get { return m_IsPreferred; }
    }

    public PersonDataEntity Contact
    {
        get { return m_Contact; }
    }

    public ICollection<OrderDataEntity> Orders
    {
        get { return m_orders.AsReadOnly(); }
    }

    public void AddOrder(OrderDataEntity p_order)
    {
        m_orders.Add(p_order);
    }

    public void RemoveOrder(OrderDataEntity p_order)
    {
        m_orders.Remove(p_order);
    }
}
|
CustomerDataEntity exposes the details of the customer through PersonDetails object, it exposes customer orders through collection of OrderDataEntity objects etc.
Sadly, the properties that CustomerDataEntity exposes are no good for direct binding, since only properties of primitive types can be bound directly to DataGridView columns and the like. Such being the case, it’s pretty clear that we cannot bind the CustomerDataEntity directly as we did with PresonDetails.
Let's say that we need to present list of CustomerDataEntity objects on the following UI.

We need to present the customers name and phone which can be retrieved through the Details property, and we need to present the number of orders which can be retrieved through the Orders property.
We want to present the customers list on the DataGridView and on the ComboBox, and we want those two to be synchronized, so if we select customer in the ComboBox - that same customer will be automatically selected in the DataGridView and vice versa.
The first step is adding some wrapper class that we call view entity. That view entity is injected with the data entity (in our case – CustomerDataEntity) and exposes properties that fit to the desired display.
public class CustomerViewEntity
{
    private readonly string m_name;
    private readonly string m_phone;
    private readonly int m_ordersAmount;

    public CustomerViewEntity(CustomerDataEntity p_customer)
    {
        m_name = p_customer.Details.Name;
        m_phone = p_customer.Details.Phone;
        m_ordersAmount = p_customer.Orders.Count;
    }

    public string Name
    {
        get { return m_name; }
    }

    public string Phone
    {
        get { return m_phone; }
    }

    public int OrdersAmount
    {
        get { return m_ordersAmount; }
    }
}
|
The CustomerViewEntity can be bound to the DataGridView just like we did with the PersonDetails class.
The following code shows the full sequence, starting from getting the data using the proper mapper, through creating the collection of view wrappers, to assigning it to the data source.
CustomerDataMapper mapper = new CustomerDataMapper();

ICollection<CustomerDataEntity> customerDataEntities = mapper.GetAllCustomers();

List<CustomerViewEntity> customerViewEntities = new List<CustomerViewEntity>();

foreach(CustomerDataEntity customerDataEntity in customerDataEntities)
{
    customerViewEntities.Add(new CustomerViewEntity(customerDataEntity));
}

customerViewEntityBindingSource.DataSource = customerViewEntities;
|
As mentioned above, after binding the CustomerViewEntity to the DataGridView, new BindingSource component is automatically added to the UI (in this case, the designer choose to call it customerViewEntityBindingSource) and assigned as the data source of the DataGridView. We can assign the same BindingSource as the data source of the ComboBox. So both DataGridView and ComboBox displays the same data from the same binding source.
As you can see, CustomerViewEntity stores the relevant data of CustomerDataEntity in its internal fields and it exposes those fields through its public properties. This means that snapshot of the customer data is presented on the grid surface, thus change to the data object will not be reflected as a result of customerViewEntityBindingSource.ResetBinding call. In addition, user will not be able to edit the CustomerDataEntity objects from the grid.
In order to make the controls synchronized with the CustomerDataEntity current data -CustomerViewEntity should be written like this -
public class CustomerSynchViewEntity
{
    private CustomerDataEntity m_customer;
    public CustomerSynchViewEntity(CustomerDataEntity p_customer)
    {
         m_customer = p_customer;
    }

    public string Name
    {
        get
        {
            return m_customer.Details.Name;
        }
    }

    public string Phone
    {
        get
        {
            return m_customer.Details.Phone;
        }
    }

    public int OrdersAmount
    {
        get
        {
            return m_customer.Orders.Count;
        }
    }
}
|
This way the grid will be updated with CustomerDataEntity current data as a result of customerViewEntityBindingSource.ResetBinding call. Though, the data still cannot be edited from the grid surface since CustomerSynchViewEntity properties has only getters.
Sorting collection of business objects
In order to add sorting ability to DataGridView that is bound to collection of objects - we have to populate the BindingSource that is bound to the grid with 'special' collection that implements IBindingList and apply the proper sorting algorithm.
The collection can drive from BindingList<T> and override the proper properties and methods to apply the sorting algorithm.
Here's an example for collection that implements the basic sorting algorithm -
public class SortableList<T> : BindingList<T>, IBindingListView
{
    PropertyComparerCollection<T> sorts;

    protected override bool IsSortedCore
    {
        get { return sorts != null; }
    }

    protected override void RemoveSortCore()
    {
        sorts = null;
    }

    protected override bool SupportsSortingCore
    {
        get { return true; }
    }

    protected override ListSortDirection SortDirectionCore
    {
        get
        {
            return sorts == null
                ? ListSortDirection.Ascending
                : sorts.PrimaryDirection;
        }
    }

    protected override PropertyDescriptor SortPropertyCore
    {
        get
        {
            return sorts == null
                ? null
                : sorts.PrimaryProperty;
        }
    }

    protected override void ApplySortCore(PropertyDescriptor prop,
        ListSortDirection direction)
    {
        ListSortDescription[] arr = {
        new ListSortDescription(prop, direction)};
        ApplySort(new ListSortDescriptionCollection(arr));
    }

    public void ApplySort(ListSortDescriptionCollection sortCollection)
    {
        bool oldRaise = RaiseListChangedEvents;
        RaiseListChangedEvents = false;
        try
        {
            PropertyComparerCollection<T> tmp =
                new PropertyComparerCollection<T>(sortCollection);

            List<T> items = new List<T>(this);

            items.Sort(tmp);

            int index = 0;
            foreach (T item in items)
            {
                SetItem(index++, item);
            }
            sorts = tmp;
        }
        finally
        {
            RaiseListChangedEvents = oldRaise;
            ResetBindings();
        }
    }

    string IBindingListView.Filter
    {
        get { throw new NotImplementedException(); }
        set { throw new NotImplementedException(); }
    }

    void IBindingListView.RemoveFilter()
    {
        throw new NotImplementedException();
    }

    ListSortDescriptionCollection IBindingListView.SortDescriptions
    {
        get { return sorts.Sorts; }
    }

    bool IBindingListView.SupportsAdvancedSorting
    {
        get { return true; }
    }

    bool IBindingListView.SupportsFiltering
    {
        get { return false; }
    }
}

public class PropertyComparerCollection<T> : IComparer<T>
{
    private readonly ListSortDescriptionCollection sorts;
    private readonly PropertyComparer<T>[] comparers;

    public ListSortDescriptionCollection Sorts
    {
        get { return sorts; }
    }

    public PropertyComparerCollection(ListSortDescriptionCollection sorts)
    {
        if (sorts == null) throw new ArgumentNullException("sorts");
        this.sorts = sorts;
        List<PropertyComparer<T>> list = new List<PropertyComparer<T>>();

        foreach (ListSortDescription item in sorts)
        {
            list.Add(new PropertyComparer<T>(item.PropertyDescriptor,
                item.SortDirection == ListSortDirection.Descending));
        }

        comparers = list.ToArray();
    }

    public PropertyDescriptor PrimaryProperty
    {
        get
        {
            return comparers.Length == 0
                ? null
                :comparers[0].Property;
        }
    }
    public ListSortDirection PrimaryDirection
    {
        get
        {
            return comparers.Length == 0
                ? ListSortDirection.Ascending
                : comparers[0].Descending
                ? ListSortDirection.Descending
                : ListSortDirection.Ascending;
        }
    }

    int IComparer<T>.Compare(T x, T y)
    {
        int result = 0;
        for (int i = 0; i < comparers.Length; i++)
        {
            result = comparers[i].Compare(x, y);
            if (result != 0) break;
        }
        return result;
    }

}

public class PropertyComparer<T> : IComparer<T>
{
    private readonly bool descending;
    public bool Descending
    {
        get { return descending; }
    }

    private readonly PropertyDescriptor property;
    public PropertyDescriptor Property
    {
        get { return property; } }

    public PropertyComparer(PropertyDescriptor property, bool descending)
    {
        if (property == null)
        {
            throw new ArgumentNullException("property");
        }

        this.descending = descending;
        this.property = property;
    }

    public int Compare(T x, T y)
    {
        // todo; some null cases
        int value = Comparer.Default.Compare(
            property.GetValue(x), property.GetValue(y));

        return descending ? -value : value;
    }
}
|
The following code shows the full sequence, starting from getting the data using the proper mapper, through creating sortable collection of view wrappers, to assigning it to the BindingSource component.
CustomerDataMapper mapper = new CustomerDataMapper();

ICollection<CustomerDataEntity> customerDataEntities = mapper.GetAllCustomers();

SortableList<CustomerViewEntity> customerViewEntities =
    new SortableList<CustomerViewEntity>();

foreach(CustomerDataEntity customerDataEntity in customerDataEntities)
{
    customerViewEntities.Add(new CustomerViewEntity(customerDataEntity));
}

customerViewEntityBindingSource.DataSource = customerViewEntities;
|
Sample project
Download from here
Interesting links
Rockford Lhotka - Windows Forms Object Data Binding in .NET 2.0
Deborah Kurata - Object Binding Tips and Tricks
Noah Coad - Data-Binding Windows Forms with ADO.NET


