Monday, December 15, 2008

Design Patterns: Visitor vs. Strategy (with C# .NET Sample)

Both visitor and strategy design patterns offer a way of separating an algorithm from an object, in this post we'll review the implementation of the patterns in a simple car wash application and try to figure out in which cases each pattern should be applied.  

Basic Object Model

The Car object is composed out of wheel, engine and body, each implements ICarElement.

image

As for now, we know that the application should support 2 kind of operations:

1. washing the car by steam.

2. washing by water.

however, the design should support more operations that will be added in the future.

Straight forward Implementation

With the most simple and straight forward approach the operations are implemented in the car elements body.

image

image

image The good thing is that it's all right in front of you, if you want to browse through the operations you don't have to look around, you go directly to the basic object model.

image The problem with the straight forward approach is that the basic object model has to be changed with each new operation that will be required in the future, as for each new operation all the elements of the car (wheel, engine and body) have to be added with an extra function. Also, the tight coupling between the basic object model and the operation makes it harder to replace operation implementation of the fly.

Strategy

With the Strategy approach there's a separate strategy object for each one of the operations. image

The element is assigned with the proper strategy, and when it is requested to do a wash - it delegates the request to the strategy that performs the wash. 

 image

imageWith this approach the basic object model is not required to change with every new operation, and operation can be gracefully replaced on the fly.

image The problem is that there are too many strategy objects, in order to replace a washing technic from 'by water' to 'by  stream' - three strategies have to be replaced. Also, with each new operation three strategies (one for each element) have to be added to the application.

Visitor

With the Visitor approach there's one visitor object for each kind of operation ('wash by water', 'wash by steam'); the visitor object contains operation implementation for all the elements of the car (wheel, engine and body). For example, the 'stream wash' operation kind has SteamWashVisitor that contains steam washing implementation for all the elements of the car.

image

When the element is requested to do a wash - it calls the appropriate method on the visitor. 

image

imageWith this approach the basic object model is not required to changed with every new operation, and operation implementations for all the elements are bundled in one Visitor that can be replaced as a whole. For example, in order to replace a washing technic from 'by water' to 'by  stream' - all we have to do is to replace the Visitor object from WaterWashVisitor to SteamWashVisitor.

image When ever the basic object model changes all the Visitors have to be changed as well, for example, if a new 'Door' object is added to the car - all the visitors have to be added with an extra 'VisitDoor' method. This is why the Visitor pattern is applicable only if the basic object model doesn't tend to change.

Summery

In most cases the operations are implemented in the body of the object on which they operate.

Often, operations are implemented in an external package or have to be replaced of the fly according to application rules, for this strategies can be used to allow external operations injection and graceful operations replacement.

In other cases (not that often) the same kind of operation has to be executed on several elements (that usually share interface) in the object model, and there's a need to easily replace the entire set of operations on the fly. Only in condition that the object model is steady and doesn't tend to change - visitors can be used to group set of operations in one object that can be  easily replaced.

Wednesday, November 5, 2008

Developing a Visual Studio Custom Tool

  • This post contains generic code that's ready for use.
  • The code was tested and debugged.
  • Full solution is available at the end of the post.

This post will walk you through the entire process of creating and registering a 'Custom Tool' for visual studio .NET.

A 'Custom Tool' can be attached to any xml file within your C# project (csproj) - once attached, it creates nested .cs file within which it maintains code that is based on the xml content.

Abstract

Those of you who developed a DataSet using visual studio .net had probably noticed that every time that the DataSet is changed and saved - the .Designer.cs file that is associated with it is automatically refilled with new auto-generated classes that reflect the structure and content (schema) of the DataSet. The generated code allows storing structured data, provides easy access to the DB etc.

In order to auto-generate code based on the DataSet (xsd file) schema - visual studio designer uses build-in 'Custom Tool' called 'MSDataSetGenerator', take a look at the properties of the DataSet (xsd file) - you will see that the 'Custom Tool' field is set to 'MSDataSetGenerator'.

 image 

MSDataSetGenerator is actually a special class that contains the logic for generating code according to DataSet schema. This class is packed in 'Custom Tool' assembly that is installed along with Visual Studio .NET.

Creating 'Custom Tool' for Visual Studio .NET

In order to understand how a 'Custom Tool' works, we'll walk through the implementation of a 'Custom Tool' that creates a simple wrapper class for basic XML.

image

By setting the 'Custom Tool' property of the xml file to XMLWrapperGenerator we've attached our 'Custom Tool' to the xml. Now, every time the xml file is saved - the XMLWrapperGenerator 'Custom Tool' parses it and generates new 'SimpleXmlFile class that is based on its new content.

XMLWrapperGenerator  'Custom Tool' implementation

The XMLWrapperGenerator class inherits from BaseCodeGeneratorWithSite (Microsoft.VisualStudio.BaseCodeGeneratorWithSite). The overridden method 'GenerateCode' is being called by visual studio every time the attached file is saved.

[Guid("52A7B6C6-E3DA-4bfa-A27C-8F1CEFA3DDC8")]
[ComVisible(true)]
public class XMLWrapperGenerator : BaseCodeGeneratorWithSite
{
    private MetadataReader m_MetadataReader;

    // This method is being called every time the attached xml is saved.
    protected override byte[] GenerateCode(
        string inputFileName, string inputFileContent)
    {
        try
        {
            // Try to generate the wrapper file.
            return GenerateCodeSafe(inputFileName);
        }
        catch(Exception ex)
        {
            // In case of a failure - print the exception 
            // as a comment on the .cs file.
            return GenerateExceptionMessage(ex);
        }
    }

    private byte[] GenerateCodeSafe(string inputFileName)
    {
        CodeCompileUnit code = new CodeCompileUnit();

        // Create Namespce
        CodeNamespace codeNamespace = CreateNamespace(code);

        // Read XML
        m_MetadataReader = new MetadataReader(inputFileName);

        // Create the Wrapper Class
        string wrapperClassName = Path.GetFileNameWithoutExtension(inputFileName);
        CreateWrapperClass(codeNamespace, wrapperClassName, m_MetadataReader.Metadata);

        string stringcode = WriteCode(CodeProvider, code);

        return Encoding.ASCII.GetBytes(stringcode);
    }

    private CodeNamespace CreateNamespace(CodeCompileUnit code)
    {
        CodeNamespace codeNamespace = new CodeNamespace(FileNameSpace);
        code.Namespaces.Add(codeNamespace);

        codeNamespace.Imports.Add(new CodeNamespaceImport("System"));
        return codeNamespace;
    }

    private CodeTypeDeclaration CreateWrapperClass(CodeNamespace codeNamespace, 
        string className, Metadata metadata)
    {

        List<ParameterMetadata> parameters = metaData.Parameters;
        // Create the header class
        CodeTypeDeclaration wrapperClass = new CodeTypeDeclaration(className);

        CodeStatementCollection statementCollection = new CodeStatementCollection();
        CodeTypeReference[] parameterReferences = new CodeTypeReference[parameters.Count];
        string[] parameterNames = new string[parameters.Count];

        for (int i = 0; i < parameters.Count; i++)
        {
            ParameterMetadata parameterMetadata = parameters[i];

            CodeTypeReference reference =
                new CodeTypeReference(parameterMetadata.TypeMetadata.Type);

            parameterReferences[i] = reference;
            parameterNames[i] = parameterMetadata.Name;

            // Generate field and add to class
            CodeMemberField memberField = CodeGenHellper.GenerateField(
                wrapperClass, parameterMetadata.Name, reference, false);

            // Add field assingment statement to constructor
            CodeGenHellper.AddAssignStatement(
                statementCollection, memberField.Name, parameterMetadata.Name);

            // Generate property and add to class
            CodeGenHellper.GenerateProperty(
                wrapperClass, memberField, parameterMetadata.Name, true);

        }

        CodeGenHellper.GeneratePublicConstructor(
            wrapperClass,
            wrapperClass.Name,
            parameterReferences,
            parameterNames,
            new string[0],
            statementCollection);

        codeNamespace.Types.Add(wrapperClass);

        return wrapperClass;

    }

    private byte[] GenerateExceptionMessage(Exception ex)
    {
        CodeCompileUnit code = new CodeCompileUnit();
        CodeNamespace codeNamespace = new CodeNamespace(FileNameSpace);
        code.Namespaces.Add(codeNamespace);

        codeNamespace.Comments.Add(new CodeCommentStatement(ex.ToString()));

        string stringcode = WriteCode(CodeProvider, code);

        return Encoding.ASCII.GetBytes(stringcode);
    }

    private static string WriteCode(CodeDomProvider p_provider, CodeCompileUnit code)
    {
        StringWriter stringwriter = new StringWriter();
        p_provider.GenerateCodeFromCompileUnit(code, stringwriter, null);
        string stringcode = stringwriter.ToString();
        stringwriter.Close();

        return stringcode;
    }
}

In 'GenerateCodeSafe' implementation we load the attached xml to MetadataReader class and use it to create the wrapper class (with CodeDome).

Registration 

In the same XMLWrapperGenerator class  we have to include some registration code which will be called with the registration (regasm) of the assembly.

// You have to make sure that the value of this attribute (Guid) 
// is exactly the same as the value of the field 'CustomToolGuid' 
// (in the registration region)
[Guid("52A7B6C6-E3DA-4bfa-A27C-8F1CEFA3DDC8")]
[ComVisible(true)]
public class XMLWrapperGenerator : BaseCodeGeneratorWithSite
{
    #region Registration

    // You have to make sure that the value of this field (CustomToolGuid) is exactly 
    // the same as the value of the Guid attribure (at the top of the class)
    private static Guid CustomToolGuid =
        new Guid("{52A7B6C6-E3DA-4bfa-A27C-8F1CEFA3DDC8}");

    private static Guid CSharpCategory =
        new Guid("{FAE04EC1-301F-11D3-BF4B-00C04F79EFBC}");

    private static Guid VBCategory =
        new Guid("{164B10B9-B200-11D0-8C61-00A0C91E29D5}");


    private const string CustomToolName = "XMLWrapperGenerator";

    private const string CustomToolDescription = "Generate wrapper for XML";

    private const string KeyFormat
        = @"SOFTWARE\Microsoft\VisualStudio\{0}\Generators\{1}\{2}";

    protected static void Register(Version vsVersion, Guid categoryGuid)
    {
        string subKey = String.Format(KeyFormat,
            vsVersion, categoryGuid.ToString("B"), CustomToolName);

        using (RegistryKey key = Registry.LocalMachine.CreateSubKey(subKey))
        {
            key.SetValue("", CustomToolDescription);
            key.SetValue("CLSID", CustomToolGuid.ToString("B"));
            key.SetValue("GeneratesDesignTimeSource", 1);
        }
    }

    protected static void Unregister(Version vsVersion, Guid categoryGuid)
    {
        string subKey = String.Format(KeyFormat,
            vsVersion, categoryGuid.ToString("B"), CustomToolName);

        Registry.LocalMachine.DeleteSubKey(subKey, false);
    }

    [ComRegisterFunction]
    public static void RegisterClass(Type t)
    {
        // Register for both VS.NET 2002 & 2003 (C#) 
        Register(new Version(8, 0), CSharpCategory);

        // Register for both VS.NET 2002 & 2003 (VB) 
        Register(new Version(8, 0), VBCategory);
    }

    [ComUnregisterFunction]
    public static void UnregisterClass(Type t)
    { // Unregister for both VS.NET 2002 & 2003 (C#) 
        Unregister(new Version(8, 0), CSharpCategory);

        // Unregister for both VS.NET 2002 & 2003 (VB) 
        Unregister(new Version(8, 0), VBCategory);
    }

    #endregion
}

In order to register the assembly open visual studio command prompt.

image

Type - '"regasm /codebase [AssemblyFullPath].dll"

image

To un-register type - '"regasm /codebase [AssemblyFullPath].dll /u"

Debugging

Create new solution, create new project and add it to the solution, add the xml file for which you've created the 'Custom Tool' (SimpleXmlFile.xml) , set the 'Custom Tool' property of the xml file (XMLWrapperGenerator), save the solution as 'Sample.sln' and close the solution.

Open the project the contains the 'Custom Tool' (XMLWrapperGenerator.csproj).

From the 'Solution Explorer' select the project and open the properties window -> select the 'Debug' tab -> from 'Start Action' select 'Start external program' -> set the external program to 'C:\Program Files\Microsoft Visual Studio 8\Common7\IDE\devenv.exe' (incase you are using 'Visual Studio 2005') -> set the full path of the solution that you've created at the first step (Sample.sln) in the 'Command line arguments' box -> Insert break-point where ever in your 'Custom Tool' class (for example - in the first line of 'GenerateCode'), Run (F5).

The 'Sample.sln'' solution will be opened, save the xml file (SimpleXmlFile.xml) -> the 'break-point' will hit -> start debugging...

Sample project

Download from here

Usefull Links

http://www.drewnoakes.com/snippets/WritingACustomCodeGeneratorToolForVisualStudio/

Wednesday, October 29, 2008

Model View Presenter (MVP) Design Pattern with .NET - Winforms vs. ASP.NET Webforms

MVP implementation for .NET desktop/smart-client (winforms) applications can take the form of Supervising Controller or Passive View. The main difference between the patterns is that 'Supervising Controller' encourages coupling between the View and the Model (via Observer-Synchronization) while 'Passive View' forbids it.

Typically, we'll chose 'Supervising Controller' if we have state full Model and we need the Views to immediately synchronize with it through the observer/observable mechanism, in this case we might be wiling to cut down on testability and allow direct link between the View and the Model.

image

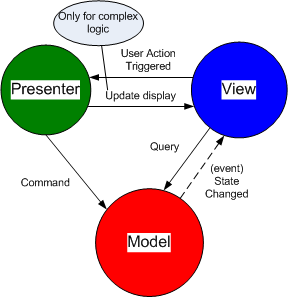
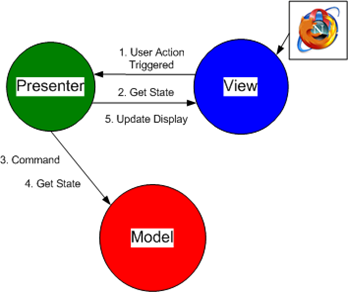
Notice that the View is prompted to update its display by both Presenter (directly) and Model (via event). In most cases the view responds to simple changes in Model state and update itself, when more complex logic is involved -the Presenter takes the liberty to change the View according to application rules.    

'Passive View' will be preferred if we want to test all presentation behavior; this pattern encourages thin Views that contain no logic thus can be easily mocked and dominant Presenter that is in charge of the entire workflow (and all updates on the View) thus can be effectively tested.

image 

Notice that in case the Model is stateless (usually in web style application) it doesn't raise 'State Changed' event (as there is no state).

In ASP.NET (webforms), due to the stateless nature of the web and the unique working method of ASP.NET - it rarely makes sense to use 'Supervising Controller' as the Model is often stateless and never used as an observer, thus the only dissent alternative for webforms applications is to use 'Passive View'. From this we can conclude that if winforms Presenters/Models are to be reused in webforms application - its probably best to implement the winforms application as 'Passive View' that is applicable for both.

This article reviews the 'Supervising Controller' implementation of MVP in winforms applications and the 'Passive View' implementation in ASP.NET webforms applications. All the code in the scope of this article is available for download.

To get more background, you can read about MVP implementation in desktop applications in 'Twisting the MVC Triad', and about MVP in web applications in 'MVP for Web Applications' (for more links- see above).

MVP in .NET Winforms

Since the 'Supervising Controller' approach encourages communication between the View and the Model its best use is where the Views need to immediately synchronize with 'sudden' changes in Model data (changes which haven't been triggered by the Presenter). In such case we'll rather have the Views registered directly to Model events rather than though the Presenter, this way we won't have to make cascading changes when ever model data structure changes.

In most cases the workflow starts from the View, through the Presenter to the Model, and back to the view via the Observer/Observable mechanism. In others, the workflow starts already from the Model and to the view via the Observer/Observable mechanism.

image_thumb1 

How does it work?

1) View delegates user inputs to the Presenter -> Presenter performs some UI related calculation, changes internal UI related state, changes the View directly, and command the Model as appropriate

"in smart client applications the Model is merely a proxy for the real Model that is placed in the server"

2) Model updates its state, performs some business operation and raises the proper event -> View handles the event - it asks relevant data from the Model and changes its display.

Normally, the view creates the Presenter and they both observe and interact with some singleton Model, the latter is also being observed by other Views/Presenters of the application.

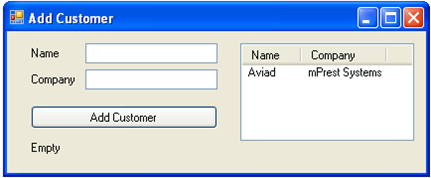
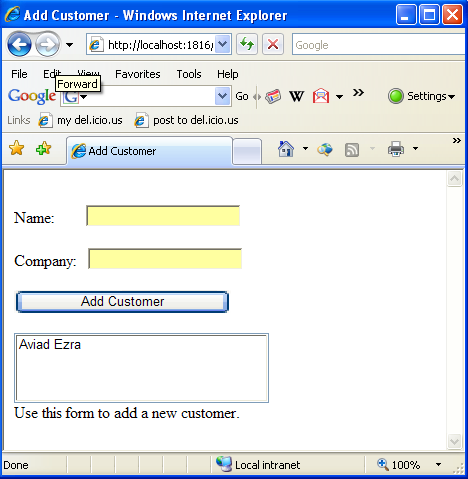
Let's examine winforms implementation for 'Add Customer' view.

image

The Model allows getting/saving data from/to the data source, it stores cached data and raises events to notify its clients about changes in its data.

// Long lasting observable with caching.
public class CustomerDao: ICustomerDao
{
    private CustomerDataMapper m_dataMapper;
    private List<Customer> m_allCustomers;
    private const string FILE_NAME = "Customers.xml";

    public event EventHandler<CustomerSavedEventArgs> CustomerSaved;

    public CustomerDao()
    {
        m_dataMapper = new CustomerDataMapper(FILE_NAME);
        m_allCustomers = m_dataMapper.GetAllCustomers();
    }

    public IEnumerable<Customer> GetAllCustomers()
    {
        return m_allCustomers;
    }

    public void Save(Customer p_customer)
    {
        m_dataMapper.Save(p_customer);
        m_allCustomers.Add(p_customer);
        raiseCustomerSaved(p_customer);
    }

    public Customer GetByName(string p_name)
    {
        foreach (Customer customer in m_allCustomers)
        {
            if (customer.ContactName == p_name)
            {
                return customer;
            }

        }

        return null;
    }

    private void raiseCustomerSaved(Customer p_customer)
    {
        if (CustomerSaved != null)
        {
            CustomerSaved(this, new CustomerSavedEventArgs(p_customer));
        }
    }
}

public class CustomerSavedEventArgs : EventArgs
{
    private readonly Customer m_customer;

    public CustomerSavedEventArgs(Customer p_customer)
    {
        m_customer = p_customer;
    }

    public Customer Customer
    {
        get { return m_customer; }
    }
}

The View creates the Presenter and injected with the Model, it delegates user inputs to the Presenter and observe the Model for changes in its data.

public partial class AddCustomerWinformsView : Form, IAddCustomerView
{
    private readonly ICustomerDao m_customerDao;
    private AddCustomerPresenter m_presenter;

    public AddCustomerWinformsView(ICustomerDao p_CustomerDao)
    {
        InitializeComponent();

        AddCustomerPresenter presenter = new AddCustomerPresenter(this, p_CustomerDao);
        m_presenter = presenter;

        m_customerDao = p_CustomerDao;
        registerToModelEvents();
    }


    public void AddCustomerToList(Customer p_customer)
    {
        ListViewItem item = new ListViewItem(p_customer.ContactName);
        item.SubItems.Add(p_customer.CompanyName);
        listView1.Items.Add(item);
    }

    public Customer CustomerToAdd
    {
        get
        {
            return new Customer(textBoxName.Text, textBoxCompany.Text);
        }
    }

    public string Message
    {
        get
        {
            return lblMessage.Text;
        }
        set
        {
            lblMessage.Text = value;
        }
    }

    private void btnAdd_Click(object sender, EventArgs e)
    {
        m_presenter.AddCustomer();
    }

    void m_customerDao_CustomerSaved(object sender, CustomerSavedEventArgs e)
    {
        AddCustomerToList(e.Customer);
    }


    private void registerToModelEvents()
    {
        m_customerDao.CustomerSaved += m_customerDao_CustomerSaved;
    }
}

The Presenter mediate between the View and the Model, it accepts gestures from the View and command the Model as appropriate.

public class AddCustomerPresenter
{
    private IAddCustomerView m_view;
    private ICustomerDao m_customerDao;

    public AddCustomerPresenter(IAddCustomerView p_view,
        ICustomerDao p_customerDao)
    {
        m_view = p_view;
        m_customerDao = p_customerDao;
    }

    public void InitView()
    {
        m_view.Message = "Use this form to add a new customer.";

        IEnumerable<Customer> customers = m_customerDao.GetAllCustomers();
        foreach (Customer customer in customers)
        {
            m_view.AddCustomerToList(customer);
        }
    }

    /// <summary>
    /// Called by the view; this grabs the updated customer from the view and commits it to the DB.
    /// </summary>
    public void AddCustomer()
    {
        if (!IsDuplicateOfExisting(m_view.CustomerToAdd))
        {
            m_customerDao.Save(m_view.CustomerToAdd);
        }
        else
        {
            m_view.Message = "The ID you provided is already in use." +
                "Please change the ID and try again.";
        }
    }

    /// <summary>
    /// Checks if a customer already exists with the same customer ID.
    /// </summary>
    private bool IsDuplicateOfExisting(Customer newCustomer)
    {
        Customer duplicateCustomer = m_customerDao.GetByName(newCustomer.ContactName);
        return duplicateCustomer != null;
    }
}

Sequence

image

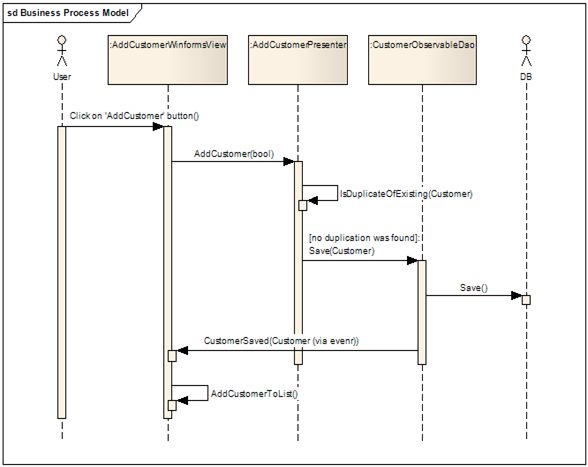
Pay attention to the following:

1) The View creates the Presenter, it lives as long as it's visible to the front end user.

2) Both View and Presenter reference the Model which act as an observable. Indeed, one of the most  important principles of MVC/P is that Model should supply mechanism to allow multiple Views to observe its data.

4) The Model is unaware of nether the View nor the Presenter.

3) The presenter mediate between the View and the Model.

View and Presenter coupling

In this example the View and the Presenter are tightly coupled, the View holds reference the Presenter and access it directly and and the Presenter holds reference the View abstraction (for testing sake).  However,  there is an alternative in which only the Presenter is tightly coupled to the View while the View is not aware of the Presenter. 

You can read more about the coupling between the View and the Presenter in Model View Presenter Styles.

Smart Client Applications

MVP was designed to fit both desktop and smart-client applications (read more). In desktop applications its abstractions reside in one node (such as demonstrated above) while in smart-client web applications they scattered around two or more nodes. In most cases the View and the Presenter reside in the client and the Model is being split between the client and server [1]

MVP in ASP.NET (Browser based) Applications

In scalable browser-based web-applications, a client interact with 1..n servers where each requests coming from the client can be satisfied by a different server. 

image

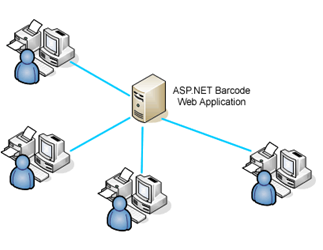
ASP.NET supplies advanced framework that shields developers from dealing with client-server communication and client rendering by making the development style of web applications (webforms) look very much like the convenient style of desktop applications (winforms).

image

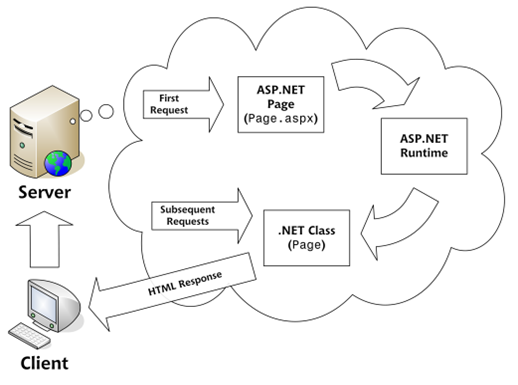
When developing winforms application the stating point is the Form, we start by dropping controls (widgets) on the form (view) surface, registering to the proper events and implementing the handler on the form code-behind; with ASP.NET it's pretty much the same deal, drop web control on aspx Page, register to the proper event and implement the handler on the page (view) code-behind. The big difference is that with web-forms we have to consider the stateless nature of the web, thus deal with the fact that the page is re-created on each post-back; but still, in both webforms and winforms the starting point is the view (page/form) and in both we really don't want the view to handle any kind of application/business logic.

In webforms applications - the View, the Presenter and the Model are recreated on each postback, thus MVP cannot be implemented as Supervising Controller. Instead, it's usually implemented as Passive View:

image

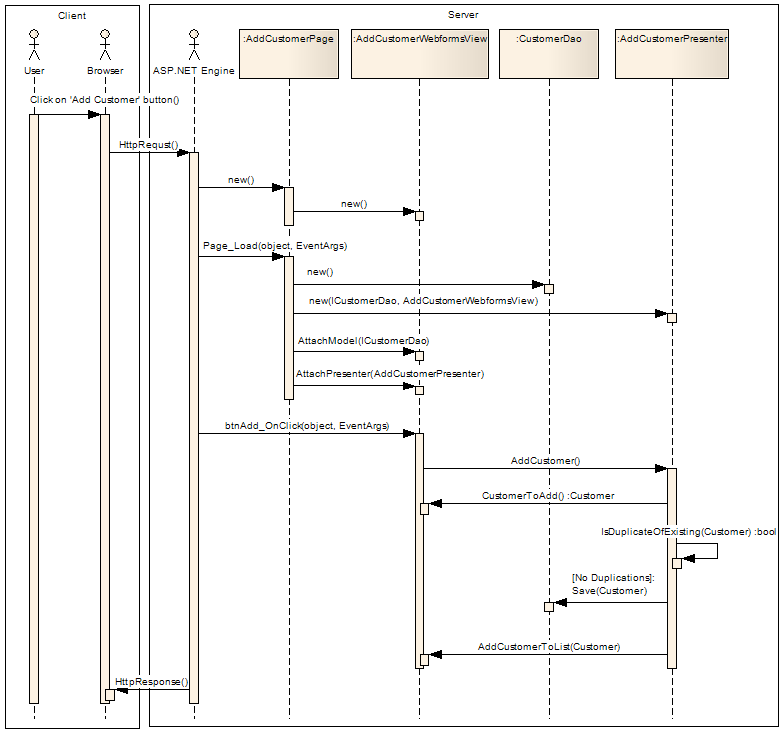
It goes like this: the client submits request (user press on control (e.g. button) that run-at-server), the View accept the request, it creates the Presenter and the Model and delegate the request to the Presenter, the Presenter gets current state from the View (textbox text, listbox selection etc), performs some UI related calculation, changes the View directly, and command the Model as appropriate, it than prompt the View to update its display. 

Since the Model is re-created on each postback - the Model is not an Observable by any mean; I guess that this is the biggest different between the typical winforms Model (that is state full thus can act as an observer) and the typical webforms Model.

Let's examine the webforms implementation for 'Add Customer' view.

image

The Model is passive, it allows saving customer data to DB and getting customer from DB (by ID).

// Static Dao. Recreated on each user session
public class CustomerDao: ICustomerDao
{
    private const string FILE_NAME = "Customers.xml";

    public IEnumerable<Customer> GetAllCustomers()
    {
        CustomerDataMapper dataMapper = new CustomerDataMapper(FILE_NAME);

        return dataMapper.GetAllCustomers();
    }


    public void Save(Customer p_customer)
    {
        CustomerDataMapper dataMapper = new CustomerDataMapper(FILE_NAME);
        dataMapper.Save(p_customer);
    }

    public Customer GetByName(string p_name)
    {
        CustomerDataMapper dataMapper = new CustomerDataMapper(FILE_NAME);
        IEnumerable<Customer> customers = dataMapper.GetAllCustomers();
        foreach (Customer customer in customers)
        {
            if (customer.ContactName == p_name)
            {
                return customer;
            }

        }

        return null;

    }
}

The Presenter mediate between the View and the Model, it accepts gestures from the View and command the Model as appropriate, it then prompt the View to change accordingly.

public class AddCustomerPresenter
{
    private IAddCustomerView m_view;
    private ICustomerDao m_customerDao;

    public AddCustomerPresenter(IAddCustomerView p_view,
        ICustomerDao p_customerDao)
    {
        m_view = p_view;
        m_customerDao = p_customerDao;
    }

    public void InitView()
    {
        m_view.Message = "Use this form to add a new customer.";

        IEnumerable<Customer> customers = m_customerDao.GetAllCustomers();

        foreach (Customer customer in customers)
        {
            m_view.AddCustomerToList(customer);
        }
    }

    /// <summary>
    /// Called by the view; this grabs the updated customer from the view 
    /// and commits it to the DB.
    /// </summary>
    public void AddCustomer()
    {
        Customer customerToAdd = m_view.CustomerToAdd;
        
        if (IsDuplicateOfExisting(customerToAdd))
        {
            // By passing HTML tags from the presenter to the view, 
            // we've essentially bound the presenter to an HTML context.  
            // You may want to consider alternatives to keep the 
            // presentation layer web/windows agnostic.
            m_view.Message = 
                "<span style=\"color:red\">The ID you provided is " +
                "already in use.</span> Please change the ID and try again.";

            return;
        }

        m_customerDao.Save(customerToAdd);

        m_view.AddCustomerToList(customerToAdd);
    }

    /// <summary>
    /// Checks if a customer already exists with the same customer ID.
    /// </summary>
    private bool IsDuplicateOfExisting(Customer newCustomer)
    {
        Customer duplicateCustomer = 
            m_customerDao.GetByName(newCustomer.ContactName);
        
        return duplicateCustomer != null;
    }
}

The View is attached with Presenter and Model, it respond to user events (button click) and delegate the event to the Presenter.

public partial class AddCustomerWebformsView : UserControl, IAddCustomerView
{
    private AddCustomerPresenter m_presenter;

    public void AttachPresenter(AddCustomerPresenter presenter)
    {
        m_presenter = presenter;
    }

    public void AddCustomerToList(Customer p_customer)
    {
        ListBox1.Items.Add(p_customer.ContactName);
    }

    protected void btnAdd_OnClick(object sender, EventArgs e)
    {
        // Be sure to check isPageValid before anything else
        if (!Page.IsValid)
        {
            Message = "There was a problem with your inputs." +
                " Make sure you supplied everything and try again";
            return;
        }


        m_presenter.AddCustomer();
    }

    public Customer CustomerToAdd
    {
        get
        {
            Customer customer = 
                new Customer(txtContactName.Text, txtCompanyName.Text);
            
            return customer;
        }
    }

    public string Message
    {
        set
        {
            lblMessage.Text = value;
        }
    }
}

The page is the starting point of the application. On each postback (e.g. after user click on button that is configured to run-at-browser) ASP.NET creates new instance of the page, calls Page_Load, and calls the event handler of the control that initiate the postback (e.g. btnAdd_OnClick).

public partial class AddCustomerPage : Page
{
    protected void Page_Load(object sender, EventArgs e)
    {
        CustomerDao customerDao = new CustomerDao();

        AddCustomerPresenter presenter = 
            new AddCustomerPresenter(addCustomerWebformsView, customerDao);
        
        addCustomerWebformsView.AttachModel(customerDao);
        
        if (!IsPostBack)
        {
            // No need to update the display on each post back, 
            // as ViewState travel from client to server and back 
            // from server to client.
            presenter.InitView();
        }
    }
}

Sequence

image

Comparing the Presenters (Supervising Controller vs. Passive View)

As you can see - the only difference between the Presenters is that Passive View Presenter update the view after saving the data while Supervising Controller Presenter doesn’t, the View register to the appropriate model event and update itself.

image

Source code can be downloaded from here.


[1] Even though the paper describing MVP (written by Mike Potel in 1996) mentioned that MVP model can be used for browser-based applications (where some code is downloaded for execution on the client), it doesn't really explain how and it seems like a little thought was given to the subject. 

Friday, September 12, 2008

MVP (Model View Presenter) Design Pattern for Web (Client-Server) Applications

The 'Model View Presenter' pattern was published in 1996 by 'Mike Potel' of the Taligent's as IBM's next generation programming model for C++ and Java applications; MVP architecture was based on Smalltalk classic MVC programming model (see above) that was most common at the time and inspired many other libraries and application frameworks. Potel described MVP as unified conceptual programming model that is adaptable across multi-tier applications and multiple client/server architectures.

This article reviews Potel's MVP design pattern focusing on its implementation in Client-Server applications.

You can read more about MVC/P patterns through the links at the top, and you can read about the implementation of MVP in .NET in 'MVP with .NET'.

MVP for Desktop applications

Potel's MVP includes six abstractions: View, Interactor, Presenter, Command, Selection, and Model.

image

One can create application using all six abstractions, using the Model to interact with the DB and store data, using the Selection to define selected subset of the data, using the Command to perform operations on the Selection, using the View to draw on the screen, using the Interactor to handle user event and initiate the appropriate Command, and finally, using the Presenter to create the particular Model, View, Selections, Commands, and Interactors, wire them up all together and thereby create the functioning application.

One can also use the Presenter alone to store data, draw the data on the screen and handle user inputs, latter View can be added to shield the Presenter from drawing on the screen, or/and add build-in Interactors to shield the Presenter from handling user inputs and so on.

Smalltalk Dolphin team came out with variation of MVP that contains only Model, View and Presenter; the Presenter in this MVP is also Interceptor, Command and Selection, thus it is in charge of responding to user events, maintaining a selection of data, and performing operations on the selection. You can read more about it in "Twisting the MVC Triad".

Collaboration

Lets see how MVP can be used as base model for simple GUI application called 'Record Printer'. The application has one simple use-case. [Trigger:] The user click on the 'Print' button [Main Success Scenario:] the selected record is printed.

image

MVP design for this GUI will have one View to draw the record list and the 'Print' button on the screen surface, two Interactors - one to capture the 'Print' button click, and one to to capture the listbox selection, one Command to send the selected record to the printer, one Selection to maintain the selected record, and one Presenter to create the View, create the Commands, create the Interactors and wire each to the appropriate Command, create the Selection and the Model. 

image

The user select Record-1, the Listbox-Interactor capture the click and prompt the Selection to point at Record-1, the View redraws, it retrieves the current selection from Selection and highlight the appropriate item in its listbox.

After, the user click on the 'Print' button, the Button-Interactor intercept the click and runs the PrintCommand, the Command retrieve the current selection and send it to the printer.

MVP in client/server applications.

In the paper describing MVP, Potel states that broad range of client/server architectures can be modeled by simple variations within the MVP model; MVP model can be used in fat-client applications, where  SQL commands generated in the client and sent across the wire, and it can be used in thin-client applications, were regular commands are being sent to the server, and server act upon them and generate the proper SQL.

Factoring the Model

One way to implement MVP architecture in Client-Server applications is to split the Model between the client and the server, that is, code appears on both sides representing a single conceptual Model; in this case all MVP origins reside in the client while the Model resides in both Client and Server; the client-side Model is merely a proxy for the real server-side Model that generates SQL, interact with the DB or with other n-tier layer and handles other kinds of business logic.

image

In today's applications the Interactor is no longer required (as View widgets inherently handle user events) and the Command and the Selection are encapsulated within the Presenter. The resulting 'striped' MVP is common architecture for rich-client applications.

image

In many IT applications the entire model resides in the clients while the sever is merely a database management system (DBMS) like SQL server  or some web-service that encapsulates calls to the DBMS.

image 

Factoring the Presenter

Another way to implement MVP architecture in Client-Server applications is to split the Presenter between the client and the server, in fat-client architecture business logic (SQL) resides in the client-side Presenter while the simpler Presenter resides in server-side,  in thin-client architecture business logic resides in the server-side Presenter while the Simpler presenter resides in client-side.

image

In Client-Server applications where presenter splits up - Interactor can't run the Command directly because the Command resides in different nodes, thus Interactor capture user events and turn to the client-side Presenter to handle them instead of directly running to the appropriate Command, client-side Presenter send the appropriate message over the wire to a server-side Presenter that runs the Command.

Saturday, July 12, 2008

Web MVC Design Pattern and ASP.NET MVC Framework

Even though MVC was designed as a framework for desktop applications three decades ago - it fits quite well in web applications which require URL mapping or/and direct handling of http messages (requests/response); this article reviews the implementation of MVC in web applications of that nature and shows how MVC is used as base architecture in ASP.NET MVC Framework.

MVC for Desktop Applications

MVC design pattern was introduced in the early 80's as a framework for desktop applications; at the time, widgets didn't had the ability to process user inputs (e.g. mouse click, keyboard press) so MVC introduced the controller entity to act as a bridge between the user and the application; in the late 80's widgets came out of the box with the ability to process user inputs so the controller screened-out and MVC twisted into MVP. Even though MVP presenter has been often referred to as controller - the real controller (the one that process user inputs) stayed in the shadows until the introduction of browser based web applications.

MVC for Web Applications

In web applications the user interact with client side browser that summarize his activities as http request (POST or GET) and send it to the server, the server process the request (i.e. pulls data from the URL or from the request message body), performs some business operation and create response stream (HTML page) at which it send back to the client that renders it to the screen.

image

Collaboration

MVC components reside in the server - the model stores data and handles business logic like always, the view generates response stream (HTML page) according to model data, the controller processes user inputs summarized as http requests (POST and GET), commands the model, changes model state, creates the proper view that is downloaded to the client and rendered to the screen.  

image

Interaction

The 'Votes Counter' UI that is shown bellow has one simple use-case. [Trigger:] The user click on the 'Vote' button [Main Success Scenario:] the DB votes field is increased by one and the text-box display is updated with the current votes value.

image

MVC design for this UI will have one view object to generate the HTML shown above, one model object to increase the votes count and to hold the total votes amount, and one controller to process the post request initiated by the 'Vote!' button, command the model to increase vote, create the view to generate updated HTML and return the response to the client.

The diagram bellow shows how MVC objects interact.

image

MVC in ASP.NET

Quick way to get familiar with ASP.NET MVC framework if through this video.

ASP.NET MVC framework enables rapid implementation of MVC based web applications; it was designed specially for applications which require more control over the HTTP input/output than the traditional ASP.NET Web Forms allows. In the Web Forms model, the input goes into the page (view) that's responsible for both handling the input and generating the output, in MVC, the input goes into the controller that's responsible for handling the input, and the page (view) is responsible for generating the output. You can read more about 'Building Web Apps without Web Forms' here.

ASP.NET MVC Framework includes a URL mapping component that enables building applications with clean URLs; The application defines controllers that contains number of predefined actions where each action process specific request, the process sequence includes executing application logic and retrieving data from the domain model up to generating the response through a view component. The framework automatically maps URL's with friendly names ("/controller name/controller action/action parameters") to action in the controller class and invokes the action with the proper parameters.

image

Let's say that the URL '/Home/About/4l' is submitted from the browser, the framework will map the URL to 'About' action of the 'HomeController' class and invoke the action with the parameter '4', the action will do whatever application logic that it requires to do, gets some 'about' data from the model, creates the proper view and post back to the browser. 

Of course,  ASP.NET MVC Framework has a lot more features than I've mentioned, it supplies generic base classes for the views, it automatically bind the views to the domain objects, it supports using the existing ASP.NET .ASPX, .ASCX files and a lot more.

Interesting links

http://osteele.com/archives/2004/08/web-mvc

http://www.hanselman.com/blog/ASPNETMVCWebFormsUnplugged.aspx

Chris Tavares - Building Web Apps without Web Forms

Saturday, July 5, 2008

Sending Typed (Serialized) Messages over .NET Sockets (C# Source Code Included)

Client-server communication via .NET sockets can be established pretty easily by using the 'Sockets communication' package introduced in .NET Socket. The package supports sending/receiving raw array of bytes in two directions and allows multiple clients connection. 

image

In some applications we'll rather transfer structured data in the form of typed messages over raw array of bytes. To accomplish this we need to add another tiny layer on the top of the communication package; the extra layer serialize typed message into bytes array on the sender side and de-serialize bytes array into  typed message in the receiver side.

image

In this post you can find all the code that you need in order to add the referred layer to .NET Socket communication packaged.

Implementation

MessageComposer

MessageComoser is used to convert message (that derive from MessageBase) to bytes[] and to convert bytes to message.

public class MessageComposer
{
    public static byte[] Serialize(int messageKind, MessageBase msg)
    {
        MemoryStream ms = new MemoryStream();
        BinaryFormatter bf1 = new BinaryFormatter();

        bf1.Serialize(ms, messageKind);
        bf1.Serialize(ms, msg);

        return ms.ToArray();
    }

    public static void Deserialize(byte[] buffer, 
        out int messageKind, out MessageBase msg)
    {
        MemoryStream ms = new MemoryStream(buffer);
        BinaryFormatter formatter = new BinaryFormatter();
        messageKind = (int)formatter.Deserialize(ms);
        msg = (MessageBase)formatter.Deserialize(ms);
    }
}


Concrete Message

Message should inherit from MessageBase so it can be serialized and deserialized via MesageComposer. The following message carry message string and time. It is used to measure network latency.

[Serializable]
 public class SendingTimeMessage: MessageBase
 {
     private DateTime m_time;
     private string m_message;

     public SendingTimeMessage(DateTime time, string message)
     {
         m_time = time;
         m_message = message;
     }

     public DateTime Time
     {
         get { return m_time; }
     }

     public string Message
     {
         get { return m_message; }
     }

     public TimeSpan CalcSpan()
     {
         return DateTime.Now - m_time;
     }
 }


Sending Concrete-Message

MessageComposer is used to covert SendingTimeMessage into bytes, the bytes are than being sent using ClientTerminal.

string mes = "Message content...";

// Create the concrete message
SendingTimeMessage message = new SendingTimeMessage(mes);

int messageKind = (int)MessageKind.SendingTime;

byte[] buffer = MessageComposer.Serialize(messageKind, message);

// Send the message (as bytes) to the server.
m_ClientTerminal.SendMessage(buffer);
Receiving Concrete-Message

MessageComposer is used to covert bytes received from the client into message, the message is being converted to string and presented on the screen. Then, the bytes are being distributed to all connected clients.

void m_Terminal_MessageRecived(Socket socket, byte[] buffer)
{
    string message = ConvertBytesToString(buffer);

    PresentMessage(listMessages, string.Format("Sockets: {0}", message));

    // Send Echo
    m_ServerTerminal.DistributeMessage(buffer);
}


private string ConvertBytesToString(byte[] bytes)
{
    int messageKind;
    MessageBase msg;
    MessageComposer.Deserialize(bytes, out messageKind, out msg);

    MessageKind kind = (MessageKind) messageKind;

    switch(kind)
    {
        case MessageKind.SendingTime:
            SendingTimeMessage sendingTimeMessage = (SendingTimeMessage)msg;
            return "SendingTimeMessage: " + sendingTimeMessage.Message;

        case MessageKind.Simple:
            SimpleMessage simpleMessage = (SimpleMessage)msg;
            return "SimpleMessage: " + simpleMessage.Message;
    }

    return "UnKnown";
}


Sample project

Download from here

Tuesday, July 1, 2008

.NET Sockets in Two Directions with Multiple Client Support (C# Source Code Included)

  • This post contains generic code that's ready for use.
  • Full solution is available at the end of the post.

Preface

This post will walk you through the implementation of a simple client-server application that establishes two way communication via .NET sockets while using infrastructure package that extracts the low level sockets API from the application.

image

The basic package can be added with an extra layer which will allow the transport of typed messages, please refer to ‘Sending Typed (Serialized) Messages’ for in detail review and case study.

If you don’t need multiple client support, please refer to ".NET Sockets - Single Client"

Implementation

Server-Side
Server Terminal

ServerTerminal opens TCP port, waits for clients connection, accepts multiple connections, listen to clients messages (bytes array) and allow to broadcast messages (bytes array) to all connected client.

Every client that connect to the server is wrapped-up in ConnectedClient object and added to clients collection. 

public class ServerTerminal
{
    public event TCPTerminal_MessageRecivedDel MessageRecived;
    public event TCPTerminal_ConnectDel ClientConnect;
    public event TCPTerminal_DisconnectDel ClientDisconnect;

    private Socket m_socket;
    private bool m_Closed;

    private Dictionary<long, ConnectedClient> m_clients = 
        new Dictionary<long, ConnectedClient>();
    
    public void StartListen(int port)
    {
        IPEndPoint ipLocal = new IPEndPoint(IPAddress.Any, port);

        m_socket = new Socket(AddressFamily.InterNetwork, 
            SocketType.Stream, ProtocolType.Tcp);
        
        try
        {
            m_socket.Bind(ipLocal);
        }
        catch(Exception ex)
        {
            Debug.Fail(ex.ToString(),
                string.Format("Can't connect to port {0}!", port));
            
            return;
        }

        m_socket.Listen(4);
        
        // Assign delegate that will be invoked when client connect.
        m_socket.BeginAccept(new AsyncCallback(OnClientConnection), null);
    }

    private void OnClientConnection(IAsyncResult asyn)
    {
        if (m_Closed)
        {
            return;
        }

        try
        {
            Socket clientSocket = m_socket.EndAccept(asyn);

            RaiseClientConnected(clientSocket);
            
            ConnectedClient connectedClient = new ConnectedClient(clientSocket);

            connectedClient.MessageRecived += OnMessageRecived;
            connectedClient.Disconnected += OnClientDisconnection;

            connectedClient.StartListen();

            long key = clientSocket.Handle.ToInt64();
            if (m_clients.ContainsKey(key))
            {
                Debug.Fail(string.Format(
                    "Client with handle key '{0}' already exist!", key));
            }

            m_clients[key] = connectedClient;
            
            // Assign delegate that will be invoked when next client connect.
            m_socket.BeginAccept(new AsyncCallback(OnClientConnection), null);
        }
        catch (ObjectDisposedException odex)
        {
            Debug.Fail(odex.ToString(),
                "OnClientConnection: Socket has been closed");
        }
        catch (Exception sex)
        {
            Debug.Fail(sex.ToString(), 
                "OnClientConnection: Socket failed");
        }
    }

    private void OnClientDisconnection(Socket socket)
    {
        RaiseClientDisconnected(socket);

        long key = socket.Handle.ToInt64();
        if (m_clients.ContainsKey(key))
        {
            m_clients.Remove(key);
        }
        else
        {
            Debug.Fail(string.Format(
                "Unknown client '{0}' has been disconnected!", key));
        }
    }
  public void DistributeMessage(byte[] buffer)
  {
      try
      {
          foreach (ConnectedClient connectedClient in m_clients.Values)
          {
              connectedClient.Send(buffer);
          }
      }
      catch (SocketException se)
      {
          Debug.Fail(se.ToString(), string.Format(
             "Buffer could not be sent"));
      }
 }
    public void Close()
    {
        try
        {
            if (m_socket != null)
            {
                m_Closed = true;

                // Close the clients
                foreach (ConnectedClient connectedClient in m_clients.Values)
                {
                    connectedClient.Stop();
                }

                m_socket.Close();

                m_socket = null;
            }
        }
        catch (ObjectDisposedException odex)
        {
            Debug.Fail(odex.ToString(), "Stop failed");
        }
    }

    private void OnMessageRecived(Socket socket, byte[] buffer)
    {
        if (MessageRecived != null)
        {
            MessageRecived(socket, buffer);
        }
    }

    private void RaiseClientConnected(Socket socket)
    {
        if (ClientConnect != null)
        {
            ClientConnect(socket);
        }
    }

    private void RaiseClientDisconnected(Socket socket)
    {
        if (ClientDisconnect != null)
        {
            ClientDisconnect(socket);
        }
    }
}
ConnectedClient

This class is instantiated for each client that connect to the server. It utilizes the SocketListener class (will be reviewed shortly) which listen and delegate the messages coming from the client.

public class ConnectedClient
{
    // Hold reference to client socket to allow sending messages to client
    private Socket m_clientSocket;
    SocketListener m_listener;

    public ConnectedClient(Socket clientSocket)
    {
        m_clientSocket = clientSocket;
        m_listener = new SocketListener();
    }

    // Register directly to SocketListener event
    public event TCPTerminal_MessageRecivedDel MessageRecived
    {
        add
        {
            m_listener.MessageRecived += value;
        }
        remove
        {
            m_listener.MessageRecived -= value;
        }
    }

    // Register directly to SocketListener event
    public event TCPTerminal_DisconnectDel Disconnected
    {
        add
        {
            m_listener.Disconnected += value;
        }
        remove
        {
            m_listener.Disconnected -= value;
        }
    }

    public void StartListen()
    {
        m_listener.StartReciving(m_clientSocket);
    }

    public void Send(byte[] buffer)
    {
        if (m_clientSocket == null)
        {
            throw new Exception("Can't send data. ConnectedClient is Closed!");
        }
        m_clientSocket.Send(buffer);
        
    }

    public void Stop()
    {
        m_listener.StopListening();
        m_clientSocket = null;
    }
}
Server Host (Console)

The server host instantiate the ServerTerminal, register to the appropriate events and call StartListening. As a result, multiple clients can connect to its port and start sending/receiving messages.

m_ServerTerminal = new ServerTerminal();

m_ServerTerminal.MessageRecived += m_Terminal_MessageRecived;
m_ServerTerminal.ClientConnect += m_Terminal_ClientConnected;
m_ServerTerminal.ClientDisconnect += m_Terminal_ClientDisConnected;

m_ServerTerminal.StartListen(alPort);
Both-Sides
Socket Listener

SocketListener allows both ServerTerminal and ClientTetminal to listen to messages coming a socket. When a message arrives – the SocketListener figures out whether it represents new data or whether it represents 'connection dropped' message. In case the message represents new data it raises the MessageReceived event and waits for the next message. In case the message indicate that the connection has been dropped - it raises the Disconnected event and exits.

public class SocketListener
{
    private const int BufferLength = 1000;
    AsyncCallback pfnWorkerCallBack;
    Socket m_socWorker;

    public event TCPTerminal_MessageRecivedDel MessageRecived;
    public event TCPTerminal_DisconnectDel Disconnected;

    public void StartReciving(Socket socket)
    {
        m_socWorker = socket;
        WaitForData(socket);
    }

    private void WaitForData(System.Net.Sockets.Socket soc)
    {
        try
        {
            if (pfnWorkerCallBack == null)
            {
                pfnWorkerCallBack = new AsyncCallback(OnDataReceived);
            }
            
            CSocketPacket theSocPkt = new CSocketPacket(BufferLength);
            theSocPkt.thisSocket = soc;

         // Start waiting asynchronously for single data packet
         soc.BeginReceive(
                theSocPkt.dataBuffer,
                0,
                theSocPkt.dataBuffer.Length,
                SocketFlags.None,
                pfnWorkerCallBack,
                theSocPkt);
        }
        catch (SocketException sex)
        {
            Debug.Fail(sex.ToString(), "WaitForData: Socket failed");
        }

    }

    private void OnDataReceived(IAsyncResult asyn)
    {
        CSocketPacket theSockId = (CSocketPacket)asyn.AsyncState;
        Socket socket = theSockId.thisSocket;

        if (!socket.Connected)
        {
            return;
        }

        try
        {
            int iRx;
            try
            {
                iRx = socket.EndReceive(asyn);
            }
            catch (SocketException)
            {
                Debug.Write("Client has been closed and cannot answer.");

                OnConnectionDroped(socket);
                return;
            }

            if (iRx == 0)
            {
                Debug.Write("Client socket has been closed.");

                OnConnectionDroped(socket);
                return;
            }

            RaiseMessageRecived(theSockId.dataBuffer);
       // Wait for the next package
            WaitForData(m_socWorker);
        }
        catch (Exception ex)
        {
            Debug.Fail(ex.ToString(), "OnClientConnection: Socket failed");
        }
    }

    public void StopListening()
    {
        if (m_socWorker != null)
        {
            m_socWorker.Close();
            m_socWorker = null;
        }
    }

    private void RaiseMessageRecived(byte[] buffer)
    {
        if (MessageRecived != null)
        {
            MessageRecived(m_socWorker, buffer);
        }
    }

    private void OnDisconnection(Socket socket)
    {
        if (Disconnected != null)
        {
            Disconnected(socket);
        }
    }

    private void OnConnectionDroped(Socket socket)
    {
        m_socWorker = null;
        OnDisconnection(socket);
    }
}

public class CSocketPacket
{
    public System.Net.Sockets.Socket thisSocket;
    public byte[] dataBuffer;

    public CSocketPacket(int buffeLength)
    {
        dataBuffer = new byte[buffeLength];
    }
}
Client-Side
Client Terminal

ClientTerminal connects to TCP port, sends messages (bytes array) to the server and listens to server messages (bytes array).

public class ClientTerminal
{
    Socket m_socClient;
    private SocketListener m_listener;

    public event TCPTerminal_MessageRecivedDel MessageRecived;
    public event TCPTerminal_ConnectDel Connected;
    public event TCPTerminal_DisconnectDel Disconncted;

    public void Connect(IPAddress remoteIPAddress, int alPort)
    {
        m_socClient = new Socket(AddressFamily.InterNetwork, 
            SocketType.Stream, ProtocolType.Tcp);
        
        IPEndPoint remoteEndPoint = new IPEndPoint(remoteIPAddress, alPort);
        
        m_socClient.Connect(remoteEndPoint);

        OnServerConnection();
    }

    public void SendMessage(byte[] buffer)
    {
        if (m_socClient == null)
        {
            return;
        }
        m_socClient.Send(buffer);

    }

    public void StartListen()
    {
        if (m_socClient == null)
        {
            return;
        }

        if (m_listener != null)
        {
            return;
        }

        m_listener = new SocketListener();
        m_listener.Disconnected += OnServerConnectionDroped;
        m_listener.MessageRecived += OnMessageRecvied;
        
        m_listener.StartReciving(m_socClient);
    }

    public void Close()
    {
        if (m_socClient == null)
        {
            return;
        }

        if (m_listener != null)
        {
            m_listener.StopListening();
        }

        m_socClient.Close();
        m_listener = null;
        m_socClient = null;
    }

    private void OnServerConnection()
    {
        if (Connected != null)
        {
            Connected(m_socClient);
        }
    }

    private void OnMessageRecvied(Socket socket, byte[] buffer)
    {
        if (MessageRecived != null)
        {
            MessageRecived(socket, buffer);
        }
    }

    private void OnServerConnectionDroped(Socket socket)
    {
        Close();
        RaiseServerDisconnected(socket);
    }

    private void RaiseServerDisconnected(Socket socket)
    {
        if (Disconncted != null)
        {
            Disconncted(socket);
        }
    }
}
Client Host (Console)

Client host should instantiate ClientTerminal and call 'Connect' with server-name/IP-address and port. After that call - m_terminal can be used to send/receive messages to/from the server.

m_ClientTerminal = new ClientTerminal();

m_ClientTerminal.Connected += m_TerminalClient_Connected;
m_ClientTerminal.Disconncted += m_TerminalClient_ConnectionDroped;
m_ClientTerminal.MessageRecived += m_TerminalClient_MessageRecived;

m_ClientTerminal.Connect(remoteIPAddress, alPort);


Sample project

Download from here